Exception handling could turn to costly operation in your code if you don’t pay much attention to it.
I feel in real life, this is like driving a non-automatic (with gear) car efficiently to get good mileage and that is possible only if you use the gear shift and clutch properly or else your car will turn to fuel drinker :) . Similarly if you don’t take care of computing and memory efficiently then your program too will turn to bad in performance and exception handling plays a key role here so lets discuss about it.
Use Catch only if needed as it is costly operation, if possible use if instead. i.e. Divide by zero exception. why not do a check for zero before divide operation if possible.
try
{
    var result = myVal/someParam;
}
catch(DivideByZeroException ex)
{
    //do what you want
}above code can be refactored like below to avoid the costly catch operation.if(someParam != 0)
{
    var result = myVal/someParam;
}
else
{
    //do what you wanted to do in the catch block
}
similar situation can arises with null values too and costly exception can be avoided using null checks.
2. You must ignore catching exception if you are not handling it. Though in some catch it may be necessary when you want to ignore the exception as fallback mechanism.
In above example it is certainly not a good practice unless there is a unavoidable circumstance to do so. In this case if possible to avoid the catch with check please do so, or even if there is possibility where caller of this handling the exception then leave it to them instead of catching here.
3. Like above point, also avoid throw if not necessary. Consider below examples where certainly throw is not necessary.
In above example, programmer is not caring or respecting the exception but still handling it throw it back to the caller, why to do so when the catch is avoided here. In any case caller of this block is expecting an exception as code says so let it go as it is and remove the try catch completely.
4. In case if and there is a need,where we need to process the exception in above example (like logging or handling fallback mechanism etc) then throw an exception then use throw only instead of throw ex to save the stack trace info.
Above example can not be justified even though inner try catch block is the demand of program nature. This example code must be refactored as.
{
       method1();
       method2();
}private void method1()
{
     try //inner try catch 1
     {
         //some code
     }
     catch(Exception ex)
     {
        //Handle exception and do not throw back to caller.
     }
}private void method2()
{
     try //inner try catch 1
     {
         //some code
     }
     catch(Exception ex)
     {
        //Handle exception and do not throw back to caller.
     }
}
OR
try
{
    method1();
    method2();
}
catch(NullException ex)
{
    //Handle exception. If needed catch can be classified well based   on the exception type behavior of method1 and method 2.
}
catch(Exception ex)
{
    //Handle exception
}private void method1()
{
     //code
}private void method2()
{
     //code
}
Any way the final goal of the code refactoring should be “avoiding multiple catch blocks”.
6. Use the finally block to respect the caller. This is very powerful features which can and must be used to cleanup your mess instead making it tough for the caller.
{
       var result = method1();
       method2();
}private int method1()
{
     int result;
     try //inner try catch 1
     {
         //some code
     }
     catch(Exception ex)
     {
        //Handle exception and do not throw back to caller.
     }
     finally
     {
        result = 0;
     }
     return result;
}private void method2()
{
     try //inner try catch 1
     {
         //some code
     }
     catch(Exception ex)
     {
        //Handle exception and do not throw back to caller.
     }
     finally
     {
        //clean your mess-ups, like closing the open connection,  fallback mechanism etc.
     }
}
7. Use Custom Exceptions. This is very important feature to avoid letting caller know the internal root cause failure for code security as the stack trace has lot of information.
//Bad Practice
public Result PerformAction()
{
     try
     {
     }
     catch(Exception ex)
     {
          throw;
     }
}//Good Practice
public Result PerformAction()
{
     try
     {
     }
     catch(Exception ex)
     {
          return new CustomException("An internal error occured");
     }
}public class CustomException : Exception
{
}
Containers are isolated from one another and bundle their own software, libraries and configuration files; they can communicate with each other through well-defined channels.
This is the technology, I feel everyone is aware of regardless of, whether they are using it or not. Today here I’m gonna list out some best practices to tune up your docker file if you are creating one. Below points will help you to create optimized, cleaner and maintainable docker and They are:
1. Use the appropriate specific version image as base image instead of using generalized base image and start installing required packages.
For Microsoft we have well defined Images as our need, think about a situation when you need a Linux image to host NodeJS application. So in this case instead of pulling Linux image like ‘From ubuntu’ and then installing node on this, always look NodeJs image. i.e.
In above both the example I am explicitly mentioned the image version which is optional. “From node” is equivalent to ““From node:latest” hence this will always pull the latest of node image whenever you build it which might break your stuff hence avoid doing that.
2. Always try to use the minimum light weight image as suits your requirements.
Full blown images comes with extra tools/Utilities/features which you might not need and without understanding them you might creating a security issue too and it will also increase the image size also which may cost you extra for storage. Hence strict to specific image which you need.
All server docker images comes with various types as alpine, Bullseye, Buster, nano etc. Hence do check the available feature before using them.
use the command to inspect the images: docker image inspect {image_name}
Each command in your docker file is a layer and each layer is cached by docker on local file system. So when you rebuild the docker image and if you don’t have any change for particular layer then docker will re-use the layer from cache. This advantage us for faster downloading and faster image building.
Hence to make use of Docker caching effectively, re-arrange layers (docker commands) from least to most frequently changing layer.
i.e. lets say you use windows server image and then installing some dependency (i.e. packages/tool etc). build/package your project/code, copy/install etc. In this the correct order would be: pull window server image => run the packages/dependencies => build your project => copy the build. Below is an example of node image and installing dependency packages in correct order.
4. Avoid files/folder to copy to image not required
Use the .dockerignore to list files/folders to avoid. .dockerignore file should be in root folder level of your project. Below is the typical example of a .dockerignore file.
this is very important concept to avoid stuff like tools, files etc. required only to build the project but not required for running the application. i.e. Take an example of .Net core application, to build we need .net sdk but to run the app we only need .net runtime hence we take advantage of multi-stage build concept and use two different image with build & publish stage to build the final image. Below code depicts the same:
FROM mcr.microsoft.com/dotnet/aspnet:5.0 AS base
WORKDIR /app
EXPOSE 80
EXPOSE 443FROM mcr.microsoft.com/dotnet/sdk:5.0 AS build
WORKDIR /src
COPY ["CoreWebAPIDemo.csproj", "."]
RUN dotnet restore "./CoreWebAPIDemo.csproj"
COPY . .
WORKDIR "/src/."
RUN dotnet build "CoreWebAPIDemo.csproj" -c Release -o /app/buildFROM build AS publish
RUN dotnet publish "CoreWebAPIDemo.csproj" -c Release -o /app/publishFROM base AS final
WORKDIR /app
COPY --from=publish /app/publish .
ENTRYPOINT ["dotnet", "CoreWebAPIDemo.dll"]
6. Use the least privileged user to start the application
Docker by default uses the default user which is root user having root level access which could be a security risk. Hence to avoid that it recommended to create a dedicated user with least privilege required to run the application from docker container. i.e. I have a dedicated user with all required permission required to my application to run, hence setting it up using below code here.
USER ContainerUserENTRYPOINT ["dotnet", "CoreWebAPIDemo.dll"]
7. Perform Vulnerability scanning for Docker image
This is a must do step before releasing you docker image for production. Use the docker scan {image_name/id} command to perform scanning. Result of this will tell the vulnerabilities if any and will tell you the release patch version which has a fix so that you can make use of that. Learn about more docker scan here: https://docs.docker.com/engine/scan/
Above best practices applied for any docker image which you build irrespective of technologies Microsoft, NodeJs, Java etc. Hope you like it.
Thank you for reading it. Don’t forget to clap if you like and leave comments for suggestion. Follow me for updates on my next article(s).
Recap: What we learned so far is, gRPC is a framework to create high-performance microservice APIs built on Remote Procedure Call (RPC) pattern. It uses three basic concepts Channel, Remote Procedure calls (streams) and Messages.
It uses HTTP/2 protocol for communication and in asp.net core it is over TCP.
In gRPC .NET client-server communication goes through multiple round-trip network call to finally establish the HTTP/2 connection and that goes as: 1. Opening a socket 2. Establishing TCP connection 3. Negotiating TLS 4. Starting HTTP/2 connection
After this when the channel connection is ready to listen and serve, the communication starts where the one channel can have multiple RPCs (streams) and a stream is a collection of many messages.
gRPC purpose is to provide a high throughput performative microservice APIs architecture but to get the best of it we must follow the certain best practices otherwise our design can create a bottleneck in terms of performance.
So lets see what are the best practices to follow while designing gRPC API.
1. Reusing your gRPC channels
As we see, gRPC communication requires multiple network round-trips so we need to think about this to save the time here. Actually it is advisable to have a factory implementation to create the client and reuse it. if the client is an ASP.NET Core application then we can even take extra benefit of ASP.NET Core Dependency Injection to resolve gRPC client dependency when we need once we create. Below is code example to register the gRPC client in Core.
services.AddGrpcClient<WeatherForcast.WeatherForcastClient>(o =>
{
    o.Address = new Uri("https://localhost:7001");
});
A gRPC channel uses a single HTTP/2 connection, and concurrent calls are multiplexed on that connection. HTTP/2 connections comes with limit on maximum concurrent streams for a connection. Generally most of the server set this limit to 100 concurrent streams. Now if we follow the best practices 1 discussed above, we might get into a another problem When the number of active calls reaches the connection stream limit, additional calls are queued in the client.
To overcome this, .NET 5 introduces the SocketsHttpHandler.EnableMultipleHttp2Connections property. When set to true, additional HTTP/2 connections are created by a channel when the concurrent stream limit is reached. By default, when a GrpcChannel is created its internal SocketsHttpHandler is automatically configured to create additional HTTP/2 connections.
In case if you are using your own handler then you must consider setting property manually. i.e.
var channel = GrpcChannel.ForAddress("https://localhost", new GrpcChannelOptions
{
    HttpHandler = new SocketsHttpHandler
    {
        EnableMultipleHttp2Connections = true,
    }
});
3. Load balancing options
We talk about microservices and we don’t talk about the load balancing, how is that possible.
Well the catch here is, gRPC doesn’t work with L4 (transport) load balancers, as the L4 load balancers operates at a connection level and gRPC uses HTTP/2, which multiplexes multiple calls on a single TCP connection which results all gRPC calls over the connection go to one endpoint. Hence the recommended best effective load balance for gRPC are:
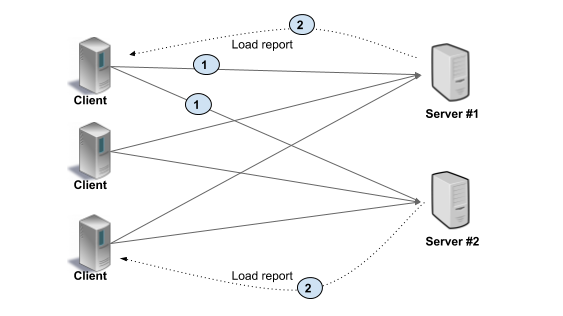
i. Client-side load balancing In Client side load balancing, the client is aware of multiple backend servers and chooses one to use for each RPC.
lients periodically makes a request to backend servers and gets the load reports and then clients implements the load balancing algorithm based on server load report. In the simpler scenario, clients can use simple round robin algorithm by ignoring server’s load report.
Benefit of this architecture is no extra loop or middle agent unlike proxy server and this can gain high performance.
Drawback of this architecture is, Clients implementing load balancing algorithms and keeping track of server load and health can make clients complex and create maintenance burden. Also the clients must be trusted in this case to go for this architecture.
Here the Load Balance Proxy Server keeps track of load on each backend and implements algorithms for distributing load fairly. Clients always makes the request to Load Balancer and then the load balancer server passes the request to one of the available backend server. This architecture is typically used for user facing services where clients from open internet can connect to servers in a data center.
Benefit of this architecture is, it works with untrusted clients and clients doesn’t have to do anything to do with load balancing.
Drawback of this architecture could be proxy server throughput which may limit the scalability.
Note: Only gRPC calls can be load balanced between endpoints. Once a streaming gRPC call is established, all messages sent over the stream go to one endpoint.
4. Inter-process communication
gRPC calls between a client and service are usually sent over TCP sockets. TCP is great for communicating across a network, but inter-process communication (IPC) is more efficient when the client and service are on the same machine.
5. Keep alive pings
Keep alive pings can be used to keep HTTP/2 connections alive during periods of inactivity. Having an existing HTTP/2 connection ready when an app resumes activity allows for the initial gRPC calls to be made quickly, without a delay caused by the connection being reestablished. Keep alive pings are configured on SocketHttpHandler and below is the code example to achieve the same
var handler = new SocketsHttpHandler
{
    PooledConnectionIdleTimeout = Timeout.InfiniteTimeSpan,
    KeepAlivePingDelay = TimeSpan.FromSeconds(60),
    KeepAlivePingTimeout = TimeSpan.FromSeconds(30),
    EnableMultipleHttp2Connections = true
};var channel = GrpcChannel.ForAddress("https://localhost:7001", new GrpcChannelOptions
{
    HttpHandler = handler
});
From the above code: PooledConnectionIdleTimeout: defines how long a connection can be idle in the pool to be considered reusable. KeepAlivePingDelay: sets the keep alive ping delay. KeepAlivePingTimeout: sets the keep alive ping timeout.
6. Go Streaming wisely
gRPC bidirectional streaming can be used to replace unary gRPC calls in high-performance scenarios whenever possible. Consider an example of calling the gRPC service in a loop, in this case instead of making a new call in loop it could be wise to go with bidirectional streaming with cancellation token option.
Replacing unary calls with bidirectional streaming for performance reasons is an advanced technique and is not appropriate in many situations so reevaluate your design if you are doing so.
7. Stay with Binary payloads
Binary payloads are default supported in Protobuf with the bytes scalar value type so you are good unless you are using other serializer like JSON as gRPC supports other serialize-deserialize methods too.
8. Send and read binary payloads without copying it
When you are dealing with ByteString instance for the request or response, it is recommended that to use UnsafeByteOperations.UnsafeWrap() instead of ByteString.CopyFrom(byte[] data). Benefit of this is, it doesn’t create a copy of byte arrays but make sure this byte array is not being modified while it is in use. Example: Send binary payloads
var data = await File.ReadAllBytesAsync(path);var payload = new PayloadResponse();
payload.Data = UnsafeByteOperations.UnsafeWrap(data);
Read binary payloads
var byteString = UnsafeByteOperations.UnsafeWrap(new byte[] { 0, 1, 2 });
var data = byteString.Span;for (var i = 0; i < data.Length; i++)
{
    Console.WriteLine(data[i]);
}
9. Make gRPC reliable by using deadlines and cancellation options
A deadline allows a gRPC client to specify how long it will wait for a call to complete. When a deadline is exceeded, the call is canceled. Setting a deadline is important because it provides an upper limit on how long a call can run for. It stops misbehaving services from running forever and exhausting server resources. Cancellation allows a gRPC client to cancel long running calls that are no longer needed. For example, a gRPC call that streams realtime updates is started when the user visits a page on a website. The stream should be canceled when the user navigates away from the page. Here is the way we can use it with client:
using var channel = GrpcChannel.ForAddress("https://localhost:7001");try
{
var cancellationToken = new CancellationTokenSource(TimeSpan.FromSeconds(10));

using var streamingCall = weatherClient.GetWeatherForecastStream(new Empty(), deadline: DateTime.UtcNow.AddSeconds(5));await foreach (var weatherData in streamingCall.ResponseStream.ReadAllAsync(cancellationToken: cancellationToken.Token))
    {
        Console.WriteLine(weatherData);
    }
    Console.WriteLine("Stream completed.");
}
catch (RpcException ex) when (ex.StatusCode == StatusCode.Cancelled || ex.StatusCode == StatusCode.DeadlineExceeded)
{
    Console.WriteLine("Stream cancelled/timeout.");
}
Use the cancellation token received as deadline in server side as:
public override async Task GetWeatherForecastStream(Empty request, IServerStreamWriter<WeatherForecast> responseStream, ServerCallContext context)
        {
            var i = 0;
            while(!context.CancellationToken.IsCancellationRequested && i <50)
            {
                await Task.Delay(1000);
                await responseStream.WriteAsync(_weatherForecastService.GetWeatherForecast(i));
                i++;
            }
        }
With above (please follow my previous article and mentioned github link to download the code) timeout will occure (DeadlineExceeded) if stop the breakpoint in client code at “ Console.WriteLine(weatherData);” means stop reading the stream.
10. Use Transient fault handling with gRPC retries
gRPC retries is a feature that allows gRPC clients to automatically retry failed calls. gRPC retries requires Grpc.Net.Client version 2.36.0 or later.
With above code example, Retry policies can be configured per-method and methods are matched using the Names property. Above code is configured with MethodName.Default, so it's applied to all gRPC methods called by this channel.
Above 10 points are make your gRPC highly available and work effectively hence keep a checkpoint while designing your gRPC API.
Thank you reading. Don’t forget to clap if you like and leave comments for suggestion.