gRPC is a hot cake now for Microservices development. it is a high-performance, lightweight RPC framework for Microservices development. It uses Contract-first API development, using Protocol Buffers by default, allowing for language agnostic implementations. Protobuf (Protocol Buffers) binary serialization reduces the network usage which makes it highly performative.
gRPC is based on Remote Procedure Call (RPC) pattern, uses HTTP/2 protocol for communication and uses three basic concepts Channel, Remote Procedure calls (streams) and Messages.

A channel can have multiple RPCs (streams) and a stream is a collection of many messages.
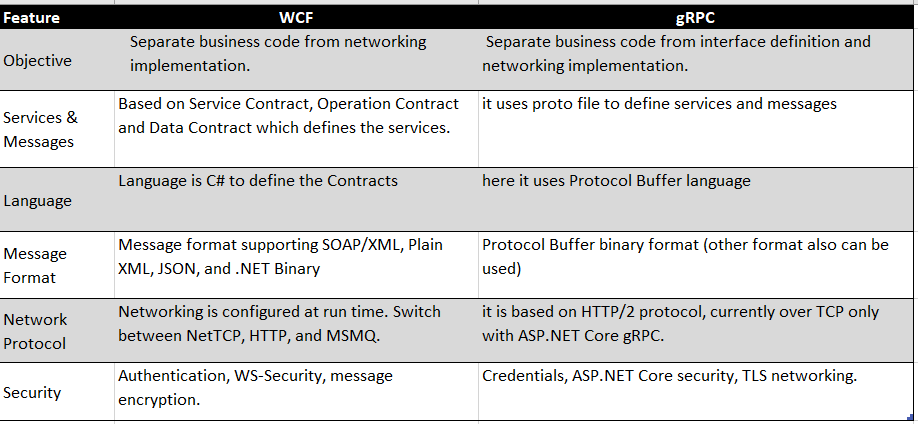
Like gRPC, Windows Communication Framework (WCF) also based on Remote Procedure Call (RPC) pattern but gRPC and WCF differs in many ways. Lets see how they differ:
Now we will create a API using gRPC on .NET 6. .NET 6 uses C# 9 & C#10 features and available with Visual Studio 2022.
How to create gRPC Service
Please follow the steps. I’m going to demonstrate the famous WeatherForecast service which you might have seen with ASP.NET Core web API template.
Step 1: We need to create a project for APIs and I’m gonna name it “GrpcServiceDemo”

This project template will automatically create a basic GreeterService API as an example template but let’s ignore it and follow the below steps to know what you need to do to create your API using gRPC on .NET.
Step 2: Create new proto file under Protos folder. I’m using “Microsoft Visual Studio Enterprise 2022 (64-bit) — Current, Version 17.0.0” has a bug which won’t let you to create proto file. So please open the window explorer for “Protos” folder and create a file “weatherForecast.proto” and paste below code in it.
syntax = "proto3";import "google/protobuf/timestamp.proto";
import "google/protobuf/empty.proto";option csharp_namespace = "GrpcServiceDemo";package weatherForcast;// The weather forecast service definition.
service WeatherForcast {
  // Get weather forecast
  rpc GetWeatherForecast (google.protobuf.Empty) returns (WeatherForecastReply);rpc GetWeatherForecastForDate (google.protobuf.Timestamp) returns (WeatherForecastReply);}// The response message containing the weather information.
message WeatherForecastReply {
 repeated  WeatherForecast Result = 1;
}message WeatherForecast {
 google.protobuf.Timestamp Date = 1;

 int32 TemperatureC = 2;

 int32 TemperatureF = 3;

 string Summary = 4;
}
First line talks about Protocol Buffer Language version.
Second and that line is for importing supported proto packages to use types TimeStamp (like DateTime in C#) and Empty type.
Fourth line of code is about defining a meaning full namespace for your services (i.e. Google.Protobuf.Examples.AddressBook). For simplicity I have just used the name of the project as we do C# project.
Fifth line is about the package declaration, which helps to prevent naming conflicts between different projects. If you don’t provide csharp_namespace then your generated classes will be placed in a namespace matching the package name
Next we define the Service API method (service contract) which follow the syntax as rpc {method_name} ({Request message type}) returns ({Response message type})
At last define the message types used for request and response. Note that, it is Protocol Buffer language so you won’t be able use C# language types. Also you service method must have request type so to fulfill the blank request service method use the “google.protobuf.Empty” type.
Step 3: Edit your .csproj project file and add the below code to include the newly added proto file.
<ItemGroup>
     <Protobuf Include="Protos\weatherForecast.proto" GrpcServices="Server" />
</ItemGroup>
Step 4: Build the project to generate C# equivalent classes which will be used in the project to build the service logic code. Please navigate to the folder .\GrpcServiceDemo\obj\Debug\net6.0\Protos, here you will find cs file as WeatherForecast.cs and WeatherForecastGrpc.cs.

Step 5: Create an interface IWeatherForecast.cs , classes WeatherForecastService.cs and WeatherForecastGrpcService.cs which will contain the logic. You may avoid the interface implementation here but doing it in that way here to demonstrate the proper code separation which you can achieve here using .NET core DI with gRPC service.
IWeatherForecastService.cs
using System.Threading.Tasks;
using Google.Protobuf.WellKnownTypes;
using Grpc.Core;
using GrpcServiceDemo;namespace GrpcServiceDemo.Services
{
    public interface IWeatherForecastService
    {
        Task<WeatherForecastReply> GetWeatherForecast(ServerCallContext context);Task<WeatherForecastReply> GetWeatherForecastForDate(Timestamp date, ServerCallContext context);    }
}
WeatherForecastService.cs
using Grpc.Core;
using GrpcServiceDemo;
using Google.Protobuf.WellKnownTypes;namespace GrpcServiceDemo.Services
{
    public class WeatherForecastService : IWeatherForecastService
    {
        private static readonly string[] Summaries = new[]
        {
            "Freezing", "Bracing", "Chilly", "Cool", "Mild", "Warm", "Balmy", "Hot", "Sweltering", "Scorching"
        };private readonly ILogger<WeatherForecastService> _logger;public WeatherForecastService(ILogger<WeatherForecastService> logger)
        {
            _logger = logger;
        }public Task<WeatherForecastReply> GetWeatherForecast(ServerCallContext context)
        {
            return Task.FromResult<WeatherForecastReply>(GetWeather());
        }public Task<WeatherForecastReply> GetWeatherForecastForDate(Timestamp date, ServerCallContext context)
        {
            return Task.FromResult<WeatherForecastReply>(GetWeather(date));
        }private WeatherForecastReply GetWeather()
        {
            var result = new WeatherForecastReply();
            for (var index = 1; index <= 5; index++)
            {
                result.Result.Add(
                    new WeatherForecast
                    {
                        Date = Timestamp.FromDateTime(DateTime.UtcNow.AddDays(index)),
                        TemperatureC = Random.Shared.Next(-20, 55),
                        Summary = Summaries[Random.Shared.Next(Summaries.Length)],
                        TemperatureF = (int)(32 + (Random.Shared.Next(-20, 55) / 0.5556))
                    }
                    );
            }
            return result;
        }private WeatherForecastReply GetWeather(Timestamp date)
        {
            var result = new WeatherForecastReply();
            result.Result.Add(
                new WeatherForecast
                {
                    Date = date,
                    TemperatureC = Random.Shared.Next(-20, 55),
                    Summary = Summaries[Random.Shared.Next(Summaries.Length)],
                    TemperatureF = (int)(32 + (Random.Shared.Next(-20, 55) / 0.5556))
                }
                );
            return result;
        }
    }
}
Above class is self explanatory as this is the implementation of the above interface IWeatherForecastService.
Step 6: Here we will create the gRPC service against the contract we defined in weatherForecast.proto. Create a class name WeatherForecastGrpcService.CS and paste below code.
using Grpc.Core;
using Google.Protobuf.WellKnownTypes;namespace GrpcServiceDemo.Services
{
    public sealed class WeatherForecastGrpcService : WeatherForcast.WeatherForcastBase
    {
        private static readonly string[] Summaries = new[]
        {
            "Freezing", "Bracing", "Chilly", "Cool", "Mild", "Warm", "Balmy", "Hot", "Sweltering", "Scorching"
        };private readonly ILogger<WeatherForecastService> _logger;
        private readonly IWeatherForecastService _weatherForecastService;public WeatherForecastGrpcService(ILogger<WeatherForecastService> logger, IWeatherForecastService weatherForecastService)
        {
            _logger = logger;
            _weatherForecastService = weatherForecastService;
        }public override Task<WeatherForecastReply> GetWeatherForecast(Empty request, ServerCallContext context)
        {
            return _weatherForecastService.GetWeatherForecast(context);
        }public override Task<WeatherForecastReply> GetWeatherForecastForDate(Timestamp date, ServerCallContext context)
        {
            return _weatherForecastService.GetWeatherForecastForDate(date, context);
        }
    }
}
In the above code, If you see the implementation inherits from WeatherForcast.WeatherForcastBase which is autogenerated abstract class from the contract we defined in weatherForecast.proto file. This abstract class will be in .\GrpcServiceDemo\obj\Debug\net6.0\Protos\WeatherForecastGrpc.cs file. The name of autogenerated class code follow the naming convention as “{ServiceType}.{ServiceType}Base” as defined in proto file.This is important as you shouldn’t deviate your service from the service contract as the client will be referring the contract (proto file) to call the service method. If you remember, the process is similar to WCF svc file using which client used to generate the proxy instance of the service.
Other things to notice here is, Marking the class as sealed as there is no way other should inherit is as this is for gRPC service contract only and methods here are overridden because the default implementation of it (virtual in abstract class), are already created which throws Unimplemented RpcException.
Step 7: Add below highlighted line of code in Program.cs or copy paste the entire code. This code will register the gRPC service in the request pipeline to serve the request.
using GrpcServiceDemo.Services;var builder = WebApplication.CreateBuilder(args);// Add services to the container.
builder.Services.AddGrpc();
builder.Services.AddTransient<IWeatherForecastService, WeatherForecastService>();
var app = builder.Build();// Configure the HTTP request pipeline.
app.MapGrpcService<WeatherForecastGrpcService>();app.Run();
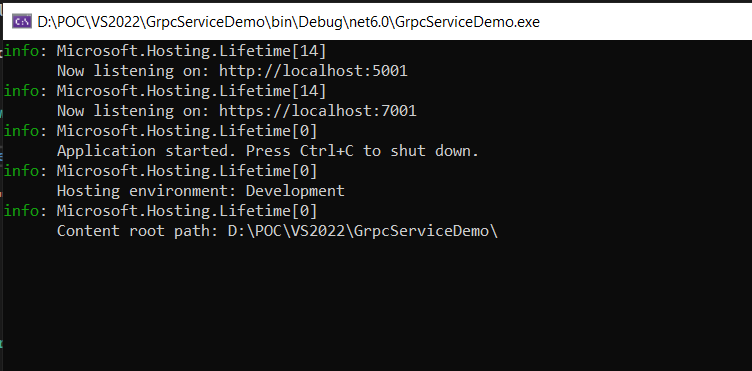
Now the gRPC service is ready to be host and consumed. In development, if you run the service you will see the output which it is running as:
Note: gRPC endpoints can be consumed only through a gRPC client so next section let’s create a client to demonstrate how we can consume this.
How to create gRPC Service Client
Please follow the below steps here to create a gRPC client in .NET core C#.
Step 1: Create a .NET core console application name “GrpcClientDemo”, you may change the as you want and Install below listed packages from nuget.

Note: You can use any latest available stable version.
Step 2: Create a folder name “Protos” and copy the weatherForecast.proto file from the service and paste it here. The only change you need to do here if you want: csharp_namespace value, if it is different than package name and you want to keep it as per client project namespace.
Step 3: Include the proto file in the csproj by adding below line of code:
<ItemGroup>
  <Protobuf Include="Protos\weatherForecast.proto" GrpcServices="Client" />
 </ItemGroup>
Step 4: Consumpation: Create a channel using the endpoint address (as per your host) as shown in service output. Using the channel instantiate the client for gRPC service and call the methods as defined in gRPC service contract. Follow the below is the code: Program.cs
using Google.Protobuf.WellKnownTypes;
using Grpc.Net.Client;
using GrpcServiceDemo;// The port number must match the port of the gRPC server.
using var channel = GrpcChannel.ForAddress("https://localhost:7001");var weatherClient = new WeatherForcast.WeatherForcastClient(channel);var request = new Google.Protobuf.WellKnownTypes.Empty();
var weatherInfo = weatherClient.GetWeatherForecast(request);
Console.WriteLine("*****Weather forecast for 5 days*****");
Console.WriteLine(weatherInfo.Result);weatherInfo = weatherClient.GetWeatherForecastForDate(Timestamp.FromDateTime(DateTime.UtcNow));
Console.WriteLine("*****Weather forecast for today*****");
Console.WriteLine(weatherInfo.Result);request = new Google.Protobuf.WellKnownTypes.Empty();
weatherInfo = await weatherClient.GetWeatherForecastAsync(request);
Console.WriteLine("*****Weather forecast for 5 days*****");
Console.WriteLine(weatherInfo.Result);weatherInfo = await weatherClient.GetWeatherForecastForDateAsync(Timestamp.FromDateTime(DateTime.UtcNow));
Console.WriteLine("*****Weather forecast for today*****");
Console.WriteLine(weatherInfo.Result);Console.ReadKey();
Though above code is straight forward of calling the service method but I’m sure you must have noticed that I’ve demonstrated here the Async and Sync call both.
Now run the code and you will see the output as below.

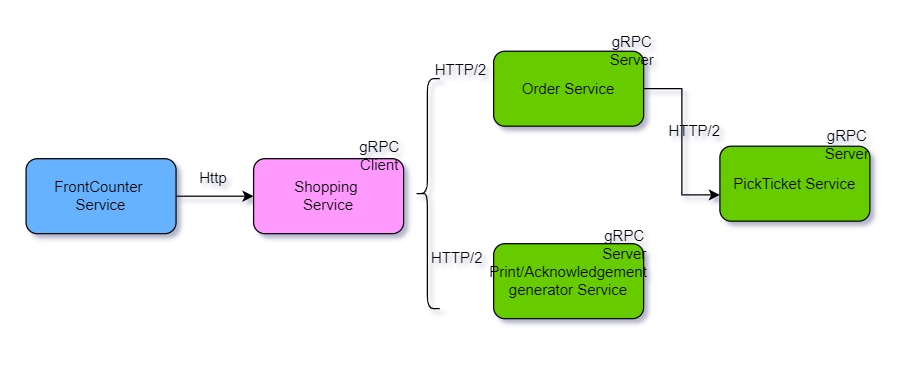
Here is the simple example of Microservices architectures talking to each other.
Thank you reading. Don’t forget to clap if you like and leave comments for suggestion.