Wednesday 15 December 2021

Tune up your Docker file — Best Practices

 Docker is a set of platform as a service products that use OS-level virtualization to deliver software in packages called containers.

1. Use the appropriate specific version image as base image instead of using generalized base image and start installing required packages.

FROM mcr.microsoft.com/dotnet/aspnet:5.0 AS base
From node:17.2.0

2. Always try to use the minimum light weight image as suits your requirements.

docker image inspect mcr.microsoft.com/dotnet/aspnet:5.0

3. Optimize caching image layer

FROM node:17.2.0-alpineWORKDIR /appCOPY package.json package-lock.json .RUN npm install --productionCOPY myapp /appCMD ["node", "src/index.js"] 

4. Avoid files/folder to copy to image not required

**/.classpath
**/.dockerignore
**/.env
**/.git
**/.gitignore
**/.project
**/.settings
**/.toolstarget
**/.vs
**/.vscode
**/*.*proj.user
**/*.dbmdl
**/*.jfm
**/azds.yaml
**/bin
**/charts
**/docker-compose*
**/Dockerfile*
**/node_modules
**/npm-debug.log
**/obj
**/secrets.dev.yaml
**/values.dev.yaml
LICENSE
README.md

5. Use the Multi-stage builds concepts.

FROM mcr.microsoft.com/dotnet/aspnet:5.0 AS base
WORKDIR /app
EXPOSE 80
EXPOSE 443
FROM mcr.microsoft.com/dotnet/sdk:5.0 AS build
WORKDIR /src
COPY ["CoreWebAPIDemo.csproj", "."]
RUN dotnet restore "./CoreWebAPIDemo.csproj"
COPY . .
WORKDIR "/src/."
RUN dotnet build "CoreWebAPIDemo.csproj" -c Release -o /app/build
FROM build AS publish
RUN dotnet publish "CoreWebAPIDemo.csproj" -c Release -o /app/publish
FROM base AS final
WORKDIR /app
COPY --from=publish /app/publish .

ENTRYPOINT ["dotnet", "CoreWebAPIDemo.dll"]

6. Use the least privileged user to start the application

USER ContainerUserENTRYPOINT ["dotnet", "CoreWebAPIDemo.dll"]

7. Perform Vulnerability scanning for Docker image

Thursday 9 December 2021

Best practices with gRPC on .NET

 In my last couple of articles on gRPC gRPC on .NET and Streaming with gRPC on .NET we talked about creating microservices APIs using gRPC.

Recap: What we learned so far is, gRPC is a framework to create high-performance microservice APIs built on Remote Procedure Call (RPC) pattern. It uses three basic concepts Channel, Remote Procedure calls (streams) and Messages.

It uses HTTP/2 protocol for communication and in asp.net core it is over TCP.

In gRPC .NET client-server communication goes through multiple round-trip network call to finally establish the HTTP/2 connection and that goes as:
1. Opening a socket
2. Establishing TCP connection
3. Negotiating TLS
4. Starting HTTP/2 connection

After this when the channel connection is ready to listen and serve, the communication starts where the one channel can have multiple RPCs (streams) and a stream is a collection of many messages.

gRPC purpose is to provide a high throughput performative microservice APIs architecture but to get the best of it we must follow the certain best practices otherwise our design can create a bottleneck in terms of performance.

So lets see what are the best practices to follow while designing gRPC API.

1. Reusing your gRPC channels

As we see, gRPC communication requires multiple network round-trips so we need to think about this to save the time here.
Actually it is advisable to have a factory implementation to create the client and reuse it. if the client is an ASP.NET Core application then we can even take extra benefit of ASP.NET Core Dependency Injection to resolve gRPC client dependency when we need once we create. Below is code example to register the gRPC client in Core.

services.AddGrpcClient<WeatherForcast.WeatherForcastClient>(o =>
{
o.Address = new Uri("https://localhost:7001");
});

Read more about gRPC client factory integration in .Net here.

2. Consider Connection Concurrency

A gRPC channel uses a single HTTP/2 connection, and concurrent calls are multiplexed on that connection. HTTP/2 connections comes with limit on maximum concurrent streams for a connection. Generally most of the server set this limit to 100 concurrent streams.
Now if we follow the best practices 1 discussed above, we might get into a another problem When the number of active calls reaches the connection stream limit, additional calls are queued in the client.

To overcome this, .NET 5 introduces the SocketsHttpHandler.EnableMultipleHttp2Connections property. When set to true, additional HTTP/2 connections are created by a channel when the concurrent stream limit is reached. By default, when a GrpcChannel is created its internal SocketsHttpHandler is automatically configured to create additional HTTP/2 connections.

In case if you are using your own handler then you must consider setting property manually. i.e.

var channel = GrpcChannel.ForAddress("https://localhost", new GrpcChannelOptions
{
HttpHandler = new SocketsHttpHandler
{
EnableMultipleHttp2Connections = true,
}
});

3. Load balancing options

We talk about microservices and we don’t talk about the load balancing, how is that possible.

Well the catch here is, gRPC doesn’t work with L4 (transport) load balancers, as the L4 load balancers operates at a connection level and gRPC uses HTTP/2, which multiplexes multiple calls on a single TCP connection which results all gRPC calls over the connection go to one endpoint. Hence the recommended best effective load balance for gRPC are:

i. Client-side load balancing
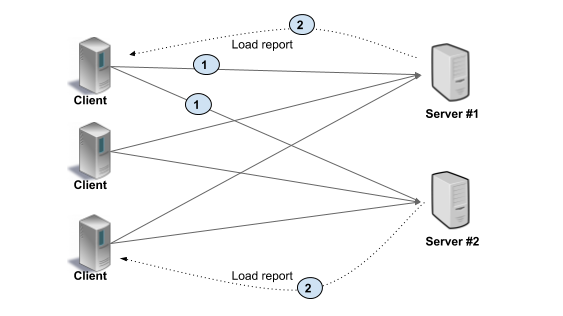
In Client side load balancing, the client is aware of multiple backend servers and chooses one to use for each RPC.

lients periodically makes a request to backend servers and gets the load reports and then clients implements the load balancing algorithm based on server load report.
In the simpler scenario, clients can use simple round robin algorithm by ignoring server’s load report.

Benefit of this architecture is no extra loop or middle agent unlike proxy server and this can gain high performance.

Drawback of this architecture is, Clients implementing load balancing algorithms and keeping track of server load and health can make clients complex and create maintenance burden. Also the clients must be trusted in this case to go for this architecture.

ii. L7 (Application) proxy load balancing
It uses the proxies server concepts and Clients doesn’t know the backend servers.

Here the Load Balance Proxy Server keeps track of load on each backend and implements algorithms for distributing load fairly. Clients always makes the request to Load Balancer and then the load balancer server passes the request to one of the available backend server.
This architecture is typically used for user facing services where clients from open internet can connect to servers in a data center.

Benefit of this architecture is, it works with untrusted clients and clients doesn’t have to do anything to do with load balancing.

Drawback of this architecture could be proxy server throughput which may limit the scalability.

Note: Only gRPC calls can be load balanced between endpoints. Once a streaming gRPC call is established, all messages sent over the stream go to one endpoint.

4. Inter-process communication

gRPC calls between a client and service are usually sent over TCP sockets. TCP is great for communicating across a network, but inter-process communication (IPC) is more efficient when the client and service are on the same machine.

5. Keep alive pings

Keep alive pings can be used to keep HTTP/2 connections alive during periods of inactivity. Having an existing HTTP/2 connection ready when an app resumes activity allows for the initial gRPC calls to be made quickly, without a delay caused by the connection being reestablished.
Keep alive pings are configured on SocketHttpHandler and below is the code example to achieve the same

var handler = new SocketsHttpHandler
{
PooledConnectionIdleTimeout = Timeout.InfiniteTimeSpan,
KeepAlivePingDelay = TimeSpan.FromSeconds(60),
KeepAlivePingTimeout = TimeSpan.FromSeconds(30),

EnableMultipleHttp2Connections = true
};
var channel = GrpcChannel.ForAddress("https://localhost:7001", new GrpcChannelOptions
{
HttpHandler = handler
});

From the above code:
PooledConnectionIdleTimeout: defines how long a connection can be idle in the pool to be considered reusable.
KeepAlivePingDelay: sets the keep alive ping delay.
KeepAlivePingTimeout: sets the keep alive ping timeout.

6. Go Streaming wisely

gRPC bidirectional streaming can be used to replace unary gRPC calls in high-performance scenarios whenever possible.
Consider an example of calling the gRPC service in a loop, in this case instead of making a new call in loop it could be wise to go with bidirectional streaming with cancellation token option.

Replacing unary calls with bidirectional streaming for performance reasons is an advanced technique and is not appropriate in many situations so reevaluate your design if you are doing so.

7. Stay with Binary payloads

Binary payloads are default supported in Protobuf with the bytes scalar value type so you are good unless you are using other serializer like JSON as gRPC supports other serialize-deserialize methods too.

8. Send and read binary payloads without copying it

When you are dealing with ByteString instance for the request or response, it is recommended that to use UnsafeByteOperations.UnsafeWrap() instead of ByteString.CopyFrom(byte[] data). Benefit of this is, it doesn’t create a copy of byte arrays but make sure this byte array is not being modified while it is in use. Example:
Send binary payloads

var data = await File.ReadAllBytesAsync(path);var payload = new PayloadResponse();
payload.Data = UnsafeByteOperations.UnsafeWrap(data);

Read binary payloads

var byteString = UnsafeByteOperations.UnsafeWrap(new byte[] { 0, 1, 2 });
var data = byteString.Span;
for (var i = 0; i < data.Length; i++)
{
Console.WriteLine(data[i]);
}

9. Make gRPC reliable by using deadlines and cancellation options

deadline allows a gRPC client to specify how long it will wait for a call to complete. When a deadline is exceeded, the call is canceled. Setting a deadline is important because it provides an upper limit on how long a call can run for. It stops misbehaving services from running forever and exhausting server resources.
Cancellation allows a gRPC client to cancel long running calls that are no longer needed. For example, a gRPC call that streams realtime updates is started when the user visits a page on a website. The stream should be canceled when the user navigates away from the page. Here is the way we can use it with client:

using var channel = GrpcChannel.ForAddress("https://localhost:7001");try
{
var cancellationToken = new CancellationTokenSource(TimeSpan.FromSeconds(10));

using var streamingCall = weatherClient.GetWeatherForecastStream(new Empty(), deadline: DateTime.UtcNow.AddSeconds(5));
await foreach (var weatherData in streamingCall.ResponseStream.ReadAllAsync(cancellationToken: cancellationToken.Token))
{
Console.WriteLine(weatherData);
}
Console.WriteLine("Stream completed.");
}
catch (RpcException ex) when (ex.StatusCode == StatusCode.Cancelled || ex.StatusCode == StatusCode.DeadlineExceeded)
{
Console.WriteLine("Stream cancelled/timeout.");
}

Use the cancellation token received as deadline in server side as:

public override async Task GetWeatherForecastStream(Empty request, IServerStreamWriter<WeatherForecast> responseStream, ServerCallContext context)
{
var i = 0;
while(!context.CancellationToken.IsCancellationRequested && i <50)
{
await Task.Delay(1000);
await responseStream.WriteAsync(_weatherForecastService.GetWeatherForecast(i));
i++;
}
}

With above (please follow my previous article and mentioned github link to download the code) timeout will occure (DeadlineExceeded) if stop the breakpoint in client code at “ Console.WriteLine(weatherData);” means stop reading the stream.

10. Use Transient fault handling with gRPC retries

gRPC retries is a feature that allows gRPC clients to automatically retry failed calls.
gRPC retries requires Grpc.Net.Client version 2.36.0 or later.

var defaultMethodConfig = new MethodConfig
{
Names = { MethodName.Default },
RetryPolicy = new RetryPolicy
{
MaxAttempts = 5,
InitialBackoff = TimeSpan.FromSeconds(1),
MaxBackoff = TimeSpan.FromSeconds(5),
BackoffMultiplier = 1.5,
RetryableStatusCodes = { StatusCode.Unavailable }
}
};
var channel = GrpcChannel.ForAddress("https://localhost:7001", new GrpcChannelOptions
{
ServiceConfig = new ServiceConfig { MethodConfigs = { defaultMethodConfig } }
});

With above code example, Retry policies can be configured per-method and methods are matched using the Names property. Above code is configured with MethodName.Default, so it's applied to all gRPC methods called by this channel.

Above 10 points are make your gRPC highly available and work effectively hence keep a checkpoint while designing your gRPC API.

Thank you reading. Don’t forget to clap if you like and leave comments for suggestion.

Friday 3 December 2021

Different Exchange Types in RabbitMQ

 Before this I have written two articles related to RabbitMQ here, one to demonstrate implementation of RabbitMQ in .NET : RabbitMQ in .NET Core

and second one to demonstrate the implementation of a Notification feature using RabbitMQ: Notification Queue : RabbitMQ in .NET Core

In my second example I have used “Direct” exchange type to build the Notification feature. In RabbitMQ Exchange and Queue are two very important concepts you need to understand to design your queuing server with RabbitMQ and that is what we are going to demonstrate here.

What is Queue

Queue is a storage to store ordered collection of messages and allows enqueue and dequeue in FIFO (first in first out) order. It has following properties to define the nature of Queue:
1. Name: it’s an unique name of the queue.
2. Durable: Decide if the queue will survive in case if broker restart.
3. Exclusive: Decide if the queue will be used by only one connection and then queue will be deleted with the connection closes.
4. Auto-delete: Decides if the queue will be auto deleted with its last consumer (if any) unsubscribes to the queue.
5. Arguments: This is optional and used by plugins and broker-specific features such as message TTL, queue length limit, etc)

What is Exchange

Exchange is a routing agent which routes the messages to different queues with the help of header attributes, bindings, and routing keys. In RabbitMQ, published messages are not directly sent to the queue instead message is published to exchange then it is sent to the queue.

In Above example, Exchange type is “fanout” which will publish the same message to all the available queues. Below is the code to set the Exchange as fanout for sender and publisher side both:

channel.ExchangeDeclare(exchange: "fanoutExchange", type: ExchangeType.Fanout);orchannel.ExchangeDeclare(exchange: "fanoutExchange", type: "fanout");

Lets see what are the different Exchange types are available and what’s the use of those.

Types of Exchange

There are four types of Exchange in RabbitMQ: Fanout, Direct, Headers and Topic.

  1. Fanout: This is the default exchange type and it just broadcasts all the messages it receives to all the queues it knows. Above example code shows how to define this exchange type and if exchange type is not defined then by default it will be fanout. In fanout exchange type headers, binding or routing keys will be ignored even if it is provided and messages will be published to all the available queues.

Fanout exchanges can be useful when the same message needs to be sent to one or more queues with consumers one at a time based on default Round Robin method. Hence there is a possibility that the message 11 will be received by Consumer 2 and message 22 will be received by consumer 2.

2. Direct: In this case, a message will go to the queues whose binding key exactly matches the routing key of the message. So that is the key, based on the routing key in message, exchange agent decides which queue it should go. This is very useful when we publisher published a message targeting only specific queue. Below is the code to define the specific routing key to drive the delivery queue.

Publisher code to publish the message with routing key.

channel.BasicPublish(exchange: "directExchange",
routingKey: "mysecretchannel",
basicProperties: properties,
body: body);

Subscriber code to read the message from queue with routing key

channel.ExchangeDeclare(exchange: "directExchange", type: ExchangeType.Direct);channel.QueueBind(queue: "myMsgQueue", exchange: "directExchange", routingKey: "mysecretchannel");

In Direct Exchange “One queue can be bind with multiple routing” hence this is useful when multiple type of messages needs to be delivered to one queue and this is possible when by binding one queue with multiple routing keys.

3. Topic: Topic exchange type also works on routing key match but instead of exact match, it matches the pattern of routing key. There are mandatory rule or guidelines needs to be followed to define the pattern of routing key and they are:
i. Routing key must be a list of words, delimited by dots.
ii. There can be as many words in the routing key as you like but only up to the limit of 255 bytes is possible.
iii. In the routing key you can use * (star) to substitute for exactly one word.
iv. In the routing key you can use # (hash) to substitute for zero or more words.

examples of valid rounting_key patters are:
lazy.orange.elephant*.*.elephantlazy.orange.#*.orange.*

Topic exchange is powerful in nature compare to other exchange types but at the same time it can also behave like other exchanges because of the pattern. Example:
i. When a queue is bound with “#” binding key — it will receive all the messages, regardless of the routing key — like in fanout exchange. i.e. rounting_key=”#”
ii. When special characters “*” and “#” aren’t used in bindings, the topic exchange will behave just like a direct one. i.e. routing_key=”abc”

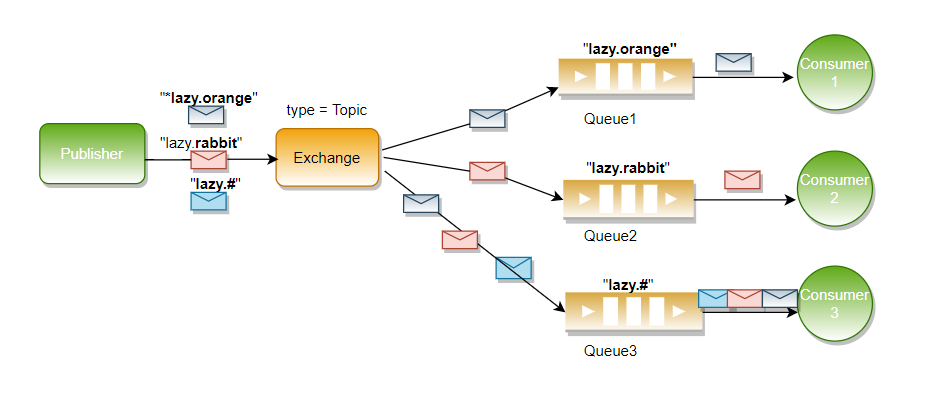
Hence below all three diagram are a possible case for Topic exchange.

In the last diagram above here, all three messages with routing_key pattern as “lazy.orange”, “lazy.rabbit”, “lazy.#” can be delivered to Consumer 3 via queue 3 and it satisfy the pattern of lazy.{any word}

4. Headers: Headers exchange routes messages based on arguments containing headers and optional values. It is similar to the topic exchange, but messages routing is based on header values instead of routing keys. A message matches if the value of the header equals the value specified upon binding.

It is possible to bind a queue to a headers exchange using more than one header for matching. In this case, the broker needs one more piece of information from the application developer, namely, should it consider messages with any of the headers matching, or all of them? This is what the “x-match” binding argument is for. When the “x-match” argument is set to “any”, just one matching header value is sufficient. Alternatively, setting “x-match” to “all” mandates that all the values must match.

Note that headers beginning with the string x- will not be used to evaluate matches.

Like Topic there are rules for headers definition also. There are 2 types of headers matching allowed which are
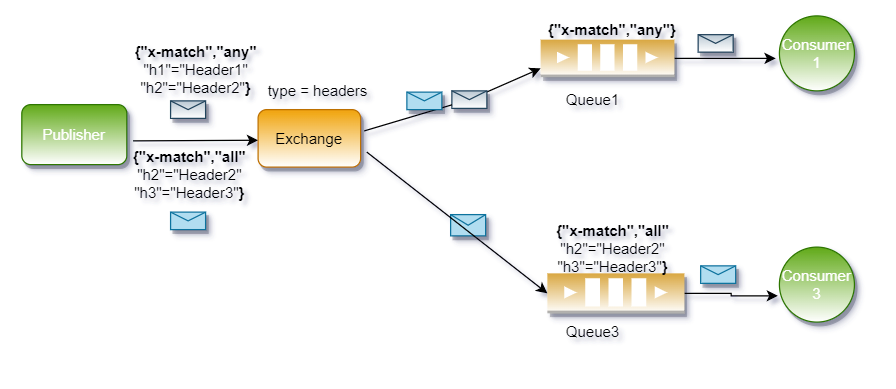
i. any (similar to logical OR): a message sent to the Exchange should contain at least one of the headers that Queue is linked with, then the message will be routed to the Queue. i.e. { “x-match”, “any” ..}
ii. all (similar to logical AND): if a queue is bound with headers has x-match = all, messages that have all of its listed headers will be forwarded to the Queue. i.e. { “x-match”, “all” ..}

In above diagram, Queue 1 can receive both type of message as shown here but queue 2 can receive only the 2nd message which headers are exactly matching with queue headers.

Thank you reading. Don’t forget to clap if you like and leave comments for suggestion.