Saturday 26 June 2021

Defining Custom IP range for Docker Containers

 I feel or I would recommend, it is always good to go with custom subnet IP range for your docker containers and you would need it for many reasons:

  1. What id default IP ranges are not available
  2. You need to add the range/IP to your firewall but don’t know because of it’s dynamic nature. etc.

There are two ways you can do it and I’m saying it two ways because you would need it if you are dealing with docker containers in windows OS.

  1. Define it with Docker-Compose.yaml file.
For Linux:networks:
mycustomnet:
driver: bridge
ipam:
config:
- subnet: 20.5.0.0/24
For Windows:networks:
mycustomnet:
driver: nat
ipam:
config:
- subnet: 20.5.0.0/24

So above definition will create a name subnet under bridge/nat driver and you can use this defined subnet for your containers and your containers will always use IP from the above mentioned range only.

But this is a problem with Windows OS. In windows OS this defined network (in this case mycustomnet) will get disappear with restarting of windows OS. Aah it makes me frustrated when I faced this and unfortunately there is no solution available neither from Docker or Windows (at lease I didn’t find it as of now) and this is where I was forced to choose second approach which preferably I won’t recommend.

2. Define it via Docker Daemon.json

For windows:{"fixed-cidr": "20.5.0.0/16"}For Linux:{"default-address-pools":[
{"base":"20.5.0.0/16","size":24}
]
}

Above settings will change the default network IP range to 20.5.0.0/16 in windows as well as in Linux but in Linux I get extra advantage to mention the /24 range to be used out of /16 by creating a new named subnet. So in linux if you do >>docker network ls then you will see the defined name network as dockerartifacts_service or similar.

Since there is no problem with Linux so I would always recommend the first approach for Linux machine.

Important Note:
If you are doing the second approach for any reason, then don’t forget to delete the existing net and restart the docker engine and to do this you can use powershell command for windows as:

Get-HNSNetwork | Remove-HNSNetwork -Verbose
Restart-Service Docker -Verbose
Verbose will display the result and it is optional in command

WPF Data Binding Best Practices

 I just started learning WPF and today I’m gonna share the WPF basics for two way data bindings and the focus would be on designing your Model and ViewModel.

WPF is based on MVVM design patterns and this is how I see/understand it.

Model should only be responsible for Business & Data logics and it should not have any dependency with UI. Well, I say it as I have seen many articles where people have used INotifyPropertyChanged derived with their Models. I’m not saying it is completely wrong but doesn’t seems to be a best practices as well. Think about a scenario where your Model is shared among multiple services and wpf application.

So what I prefer here to use MVVM with Facade Pattern to separate out the UI dependency with Model.

Another important thing which I noticed with articles flooded over the internet is, Use of DependencyObject override for ViewModel for data binding. I didn’t find it a best practice as well because of the limitations/issues it is giving like:
1. It creates a View dependencies and it never meant to be a source of a binding.
2. Can’t override Equals or GetHashCode (may be less important)
3. Thread affinity problem: a huge issue dealing with multi threading
4. Serialization problem: another problem if you want to serialize anything in ViewModel
5. Difficult to read: I hate this as this implementation makes code too difficult to read/understand specially for people like me, who is learning.
6. Still need INotifyPropertyChanged for CLR properties.

Hence finally here we got two best practices to be followed for WPF data binding:
1. Use Facade for Models and 2. use INotifyPropertyChanged.

Now lets do the programming. A simple application which has a person info, First Name, Last Name and Full Name and how we bind it by following above two best practices.

Model (Person.cs)

public class Person
{
public string FirstName { get; set; }
public string LastName { get; set; }
public string FullName => $"{FirstName} {LastName}";

public Person() { }
public Person(string firstName, string lastName)
{
FirstName = firstName;
LastName = lastName;
}
}

As I said, we will not keep any dependency with Model to UI and ViewModel and the reason could be like, this model has too much probably not needed for me or we need to use multiple models together for view model.

Model Facade (ModelFacade.cs =>you name it as you want)

public class ModelFacade
{
public Person Person { get; set; }
public ModelFacade(string firstName, string lastName)
{
Person = new Person
{
FirstName = firstName,
LastName = lastName
};
}
}

Now here we go with ViewModel which will be implementing INotifyPropertyChanged. Also for code extendibility or avoid code duplicity I prefer (actually I recommend it as a best practice) ViewModelBase to separate the INotifyPropertyChanged implementation.

ViewModel (ViewModel.cs) and ViewModelBase (ViewModelBase.cs)

public class ViewModelBase : INotifyPropertyChanged
{
public event PropertyChangedEventHandler PropertyChanged;
protected void OnPropertyChanged([CallerMemberName] string propertyName = "")
{
var handler = PropertyChanged;
if (handler != null)
handler(this, new PropertyChangedEventArgs(propertyName));
}
}

public class ViewModel : ViewModelBase
{
ModelFacade _model;
public string FirstName
{
get { return _model.Person.FirstName; }
set
{
_model.Person.FirstName = value;
OnPropertyChanged("FirstName");
OnPropertyChanged("FullName");
}
}
public string LastName
{
get { return _model.Person.LastName; }
set
{
_model.Person.LastName = value;
OnPropertyChanged("LastName");
OnPropertyChanged("FullName");
}
}
public string FullName
{
get { return _model.Person.FullName; }
}
public ViewModel()
{
_model = new ModelFacade("Binod", "Mahto");
}
}

View (MainWindow.xaml)

<Window x:Class="WpfAppNet2.MainWindow"
xmlns="http://schemas.microsoft.com/winfx/2006/xaml/presentation"
xmlns:x="http://schemas.microsoft.com/winfx/2006/xaml"
xmlns:d="http://schemas.microsoft.com/expression/blend/2008"
xmlns:mc="http://schemas.openxmlformats.org/markup-compatibility/2006"
xmlns:local="clr-namespace:WpfAppNet2"
mc:Ignorable="d"
Title="MainWindow" Height="450" Width="800">
<Window.DataContext>
<local:ViewModel x:Name="vm"/>
</Window.DataContext>
<Grid Margin="10" HorizontalAlignment="Center" VerticalAlignment="Center">
<Grid.ColumnDefinitions>
<ColumnDefinition Width="20"/>
<ColumnDefinition Width="Auto"/>
<ColumnDefinition Width="20"/>
</Grid.ColumnDefinitions>
<Grid.RowDefinitions>
<RowDefinition Height="20"/>
<RowDefinition Height="Auto"/>
<RowDefinition Height="20"/>
</Grid.RowDefinitions>
<TextBlock Text="First Name:" Grid.Column="1" Grid.Row="1"/>
<TextBox Text="{Binding Mode=TwoWay, Path=FirstName, UpdateSourceTrigger=PropertyChanged}" Grid.Column="2" Grid.Row="1" Width="100" />
<TextBlock Text="Last Name:" Grid.Column="1" Grid.Row="2"/>
<TextBox Text="{Binding Mode=TwoWay, Path=LastName, UpdateSourceTrigger=PropertyChanged}" Grid.Column="2" Grid.Row="2" Width="100"/>
<TextBlock Text="Full Name:" Grid.Column="1" Grid.Row="4"/>
<TextBlock Text="{Binding FullName}" Grid.Column="2" Grid.Row="4"/>
<TextBlock Text="{Binding Mode=TwoWay, Path=Message}" Grid.Column="2" Grid.ColumnSpan="2" Grid.Row="5"/>
<Button Content="Save Me!" Name="btnSave" Click="btnSave_Click" Grid.Column="1" Grid.Row="6"/>
<TextBox TextWrapping="Wrap" AcceptsReturn="True" Name="txtSavedData" Grid.Column="1" Grid.ColumnSpan="2" Grid.Row="7"/>
</Grid>
</Window>

Suggestion: Avoid doing control drag & drop if you really want to use the WPF best of it and follow Grid Rows and Columns based design as I did here otherwise you will never get your code right in UI because of autogenerated margins when you drag and drop controls.

Code Behind. (MainWindow.xaml.cs)

public partial class MainWindow : Window
{
public MainWindow()
{
InitializeComponent();
}
private void btnSave_Click(object sender, RoutedEventArgs e)
{
txtSavedData.Text = vm.FirstName + "\n" + vm.LastName + "\n" + vm.FullName;
}
}

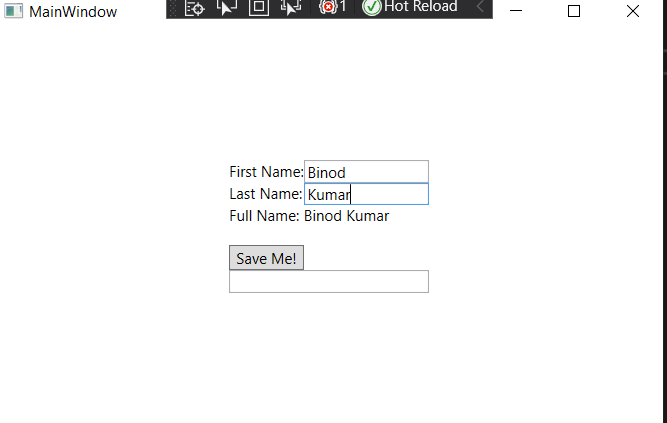
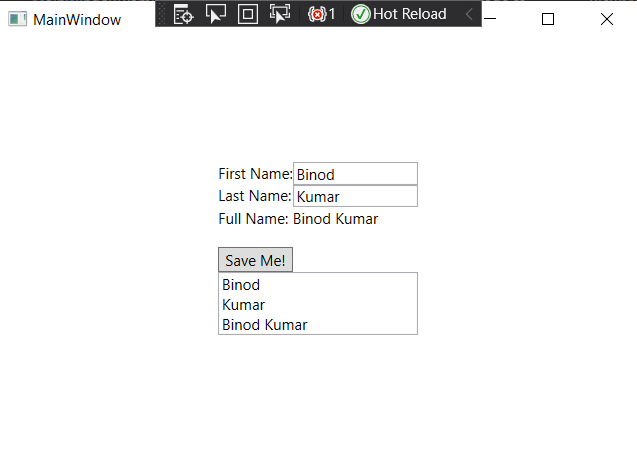
and here is the output:
1. When it loads:

2. Either change First Name or Last Name, you will the Full Name changing accordingly.

3. Click on save to see the modified state of Model Facade properties.

Now you can easily use the ModelFacase modified state to send the data back from ViewModel to Model for update.

Hope you like it.

Wednesday 2 June 2021

Configure Apache as a forward proxy on Windows

 We often need a proxy (forward proxy) as an intermediate server to serve the request between the client and the origin server via proxy. Assume a scenario like: client needs to connect to internet or some other sites by using the forward proxy as the client can’t connect to them directly.


Let’s do the setup for Apache as a forward proxy. Below are the steps which you need to follow.

Step 1: We need a Apache server so download it from here.
https://www.apachelounge.com/download/

Apache server is available as binaries in a zip file from the above link.

Step 2: Extract the downloaded zip file in a C/D/E (your choice) drive within a folder called Apache24. i.e. C:\Apache24.

Note: You may give another name instead of Apache24 but in that case you will also have to update the SRVROOT value in httpd.conf file.


Step 3: Now we will install this as a window service to take an advantage of auto start and always keeping up the server up & running. To install this Apache server as window service, open command prompt and point to C:\Apache24\bin run the below command:

C:\Apache24\bin> httpd.exe -k install -n "MyServiceName"

For more options on installation, please visit the link here: http://httpd.apache.org/docs/2.4/platform/windows.html

Step 4: Update the related config/modules for Apache to setup forward proxy. open the file C:\Apache24\conf\httpd.conf in your favorite text editor and update/modify settings as mentioned:

a. Enable related modules by uncommenting them, remove the # character from beginning.

LoadModule proxy_module modules/mod_proxy.so
LoadModule proxy_module modules/mod_proxy_http.so
LoadModule proxy_module modules/mode_proxy_connect.so
LoadModule proxy_module modules/mod_ssl.so
LoadModule proxy_module modules/mod_xml2enc.so
LoadModule proxy_module modules/mod_proxy_html.so
LoadModule proxy_module modules/mod_proxy_http2.so

Here are short descriptions of each module which will give you idea why you need them.

mod_proxy: implement a proxy/gateway for Apache HTTP Server.
mod_proxy_connect: provides support for the CONNECT HTTP method. This method is mainly used to tunnel SSL requests through proxy servers.
mod_proxy_http: provides the features used for proxying HTTP and HTTPS requests.
mod_proxy_http2: supports HTTP/2 only and works with incoming fronted requests using HTTP/1.1 or HTTP/2.
mod_ssl: provides SSL v3 and TLS v1.x support for the Apache HTTP Server. SSL v2 is no longer supported.
mod_proxy_html: provides an output filter to rewrite HTML links in a proxy situation, to ensure that links work for users outside the proxy.
mod_xml2enc: provides enhanced internationalisation support for markup-aware filter modules such as mod_proxy_html. It can automatically detect the encoding of input data and ensure they are correctly processed by the libxml2 parser, including converting to Unicode (UTF-8) where necessary.

Note: For more details on above module please visit https://httpd.apache.org/docs/2.4/mod/

b. Update the listener information for apache server. (Search the word Listen in httpd.conf file)

Listen 192.89.12.120:8082

Note: You must use IP:Port combination instead of just using either one of them which you can do and the reason behind this is: If only a port number is specified in the Listen directive, the server listens to the given port on all interfaces. If an IP address is given as well as a port, the server will listen on the given port and interface. Multiple Listen directives may be used to specify a number of addresses and ports to listen on. The server will respond to requests from any of the listed addresses and ports. For more detail please visit: https://httpd.apache.org/docs/2.4/bind.html

c. update ServerName as DNS Host Name (FQDN) if not then the IP address of the server (search the word ServerName)

ServerName 192.89.12.120:8082

Note: ServerName gives the name and port that the server uses to identify itself. This can often be determined automatically, but we recommend you specify it explicitly to prevent problems during startup. If your host doesn’t have a registered DNS name, enter its IP address here.

d. Update other details like ServerAdmin emailid, ErrorLog path, LogLevel etc as per your need.

Step 5: Now we will modify/update the proxy server details in C:/Apache24/conf/extra/proxy-html.conf file. So lets open the file using your favorite text editor and follow the below steps:

a. Enable forward proxy using ProxyRequest module by setting it to On.

ProxyRequests On

b. Configure the server address (i.e. internet, origin server etc) where request will be forwarded through this proxy server.

ProxyRemote = http://XXX.XXX.0.25:9400
OR
ProxyRemote * "${ProxyRemote}" -- in this case ProxyRemote is an environment variable which holds the origin server info.

Note: ProxyRemote is optional and needed only if you have remote proxy to redirect. In case if this machine has internet connection and don’t add this setting at all and that will make your proxy server to process the requests (internal or intranet).

c. Now lets enable the proxy routing and at the same time also restrict the forward proxy for specific subnet mask or IP if you need to do so or else ignore the Require IP setup.

<Proxy *>
Require ip 192.12 -- in this case any ip with mask 192.12 will be able to use the proxy
</Proxy>

Step 6: we are done here and it’s time to test your forward proxy setup. To test you can take another machine and setup the manual proxy setting (through internet setting or registry or curl command (if testing through curl command)), set the proxy url as ‘192.89.12.120:8082’ and run the test.

Though above configuration is for setting up the forward proxy in Windows machine but it is almost the same step you need to follow for Linux too.