Showing posts with label WPF. Show all posts

Tuesday, 10 August 2021

WPF DataGrid Drag & Drop and target Row Indicator effect

I am new to WPF and got a requirement to apply some effect on dragging and I feel it is one good topic to share which can help programmers out there, who wants to achieve same Hence sharing with you all.

So lets see, How you can apply drag & drop effect to WPF data grid. There are many custom paid/licensed wpf data grid controls which helps you to apply such effects with no effort but that is not a option always (as it is paid).

Here we are discussing two effects on data grid with drag & drop features:

  1. Enable Drag & Drop for grid: Below are the events which I used to enable drag & drop, other than these there are other DataGrid events like DragEnter, DragOver and DragLeave which you can make use of for your need.
    i. Enable AllowDrop=”True” and SelectionMode=”Extended” for the grid.
    ii. Add LoadingRow event for dragging rows and indicator line effects. Below mentioned effects code is been handled from this event.
    iii. Add SelectionChanged event to mark selected rows. This event will set Model.IsSelected to true through which we identify this row(s) are selected.
    iv. Add Drop event and the code related to dropping rows goes here, this is where collection source gets modified.
  2. Show the selected rows while dragging: This you can achieve by adding a popup and this is all you need to do:
    i. Design a container control (in my case I added a grid with no header) to show data (selected rows).
    ii. Create a popup and place the above container control within the popup.
    iii. From the code behind On Row_DragOver event bind the container control and display the popup on current mouse position and otherwise hide the popup.
private void PersonGrid_LoadingRow(object sender, DataGridRowEventArgs e){      e.Row.DragOver += Row_DragOver;}private void Row_DragOver(object sender, DragEventArgs e){     if (!popup1.IsOpen)     {           popup1.IsOpen = true;
//bind your container control with selected rows of data.
} Size popupSize = new Size(popup1.ActualWidth, popup1.ActualHeight); popup1.PlacementRectangle = new Rect(e.GetPosition(this), popupSize);}

3.  Show the row indicator line for drop location: To achieve this we need to figure out the drop location based on our data collection index position and then dynamically apply the styling to draw a Row Indicator line and to do this:
i. Create an enum which will help to hold the info for drag position.

public enum DragRowEffect{     None,     Before,     After}

ii. Add the enum in your model.

private DragRowEffect rowEffect;public DragRowEffect RowEffect{       get => rowEffect;       set => SetProperty(ref rowEffect, value); //Prism.Mvvm.BindableBase}

iii. Based on how you are changing the datagrid’s data collection (i.e remove item and then add the dragged back at respective index), set the value of RowEffect for your model On Row_DragOver event.

private void Row_DragOver(object sender, DragEventArgs e){      if (!popup1.IsOpen)
{
popup1.IsOpen = true; //bind your container control with selected rows of data.
}
Size popupSize = new Size(popup1.ActualWidth, popup1.ActualHeight);
popup1.PlacementRectangle = new Rect(e.GetPosition(this), popupSize);
var targetRowIndex = dataContext.PersonCollection.IndexOf((e.OriginalSource as FrameworkElement).DataContext as Person);
if (targetRowIndex < 0)
return;
var selectedItemsIndexes = selectedItems.Select(x => dataContext.PersonCollection.IndexOf(x)).OrderBy(x => x).ToList();
var minIndex = selectedItemsIndexes.Min();
if (targetRowIndex == 0)
dataContext.PersonCollection[targetRowIndex].RowEffect = DragRowEffect.Before;
else if (minIndex > targetRowIndex)
dataContext.PersonCollection[targetRowIndex].RowEffect = DragRowEffect.Before;
else
dataContext.PersonCollection[targetRowIndex].RowEffect = DragRowEffect.After;
}

iv. Override the DataGrid.RowStyle and change the style of the target row’s border based on your Model.RowEffect value.

<DataGrid.RowStyle><Style TargetType="{x:Type DataGridRow}"><Setter Property="SnapsToDevicePixels" Value="true"/><Setter Property="Background" Value="Transparent"/><Setter Property="VerticalAlignment" Value="Center"/><Setter Property="MinHeight" Value="40"/><Style.Triggers><DataTrigger Binding="{Binding RowEffect}" Value="1"><Setter Property="BorderBrush" Value="Blue" /><Setter Property="BorderThickness" Value="0,2,0,0" /></DataTrigger><DataTrigger Binding="{Binding RowEffect}" Value="2"><Setter Property="BorderBrush" Value="Blue" /><Setter Property="BorderThickness" Value="0,0,0,2" /></DataTrigger><Trigger Property="IsMouseOver" Value="True"><Setter Property="Background" Value="LightGray" /></Trigger><Trigger Property="IsSelected" Value="True"><Setter Property="Background" Value="LightGray" /></Trigger><Trigger Property="IsNewItem" Value="True"><Setter Property="Margin" Value="{Binding NewItemMargin, RelativeSource={RelativeSource AncestorType={x:Type DataGrid}}}"/></Trigger></Style.Triggers></Style></DataGrid.RowStyle>

if you see here in above code I have applied Style triggers based on model’s RowEffect data to change the backgroud of a row.

That’s all and as a result here is the effect which you will get:

Note: Cursor is not shown in image as it disappear while taking the snapshot because of control movement but it is there.

** Use ctrl for multi select and then ctrl+shift to start dragging multiple selected rows. This behavior your can change based on your code logic.

Download the prototype code from here: https://github.com/binodmahto/FunProjects/tree/main/WPFDragDropDemo

Saturday, 26 June 2021

WPF Data Binding Best Practices

 I just started learning WPF and today I’m gonna share the WPF basics for two way data bindings and the focus would be on designing your Model and ViewModel.

WPF is based on MVVM design patterns and this is how I see/understand it.

Model should only be responsible for Business & Data logics and it should not have any dependency with UI. Well, I say it as I have seen many articles where people have used INotifyPropertyChanged derived with their Models. I’m not saying it is completely wrong but doesn’t seems to be a best practices as well. Think about a scenario where your Model is shared among multiple services and wpf application.

So what I prefer here to use MVVM with Facade Pattern to separate out the UI dependency with Model.

Another important thing which I noticed with articles flooded over the internet is, Use of DependencyObject override for ViewModel for data binding. I didn’t find it a best practice as well because of the limitations/issues it is giving like:
1. It creates a View dependencies and it never meant to be a source of a binding.
2. Can’t override Equals or GetHashCode (may be less important)
3. Thread affinity problem: a huge issue dealing with multi threading
4. Serialization problem: another problem if you want to serialize anything in ViewModel
5. Difficult to read: I hate this as this implementation makes code too difficult to read/understand specially for people like me, who is learning.
6. Still need INotifyPropertyChanged for CLR properties.

Hence finally here we got two best practices to be followed for WPF data binding:
1. Use Facade for Models and 2. use INotifyPropertyChanged.

Now lets do the programming. A simple application which has a person info, First Name, Last Name and Full Name and how we bind it by following above two best practices.

Model (Person.cs)

public class Person
{
public string FirstName { get; set; }
public string LastName { get; set; }
public string FullName => $"{FirstName} {LastName}";

public Person() { }
public Person(string firstName, string lastName)
{
FirstName = firstName;
LastName = lastName;
}
}

As I said, we will not keep any dependency with Model to UI and ViewModel and the reason could be like, this model has too much probably not needed for me or we need to use multiple models together for view model.

Model Facade (ModelFacade.cs =>you name it as you want)

public class ModelFacade
{
public Person Person { get; set; }
public ModelFacade(string firstName, string lastName)
{
Person = new Person
{
FirstName = firstName,
LastName = lastName
};
}
}

Now here we go with ViewModel which will be implementing INotifyPropertyChanged. Also for code extendibility or avoid code duplicity I prefer (actually I recommend it as a best practice) ViewModelBase to separate the INotifyPropertyChanged implementation.

ViewModel (ViewModel.cs) and ViewModelBase (ViewModelBase.cs)

public class ViewModelBase : INotifyPropertyChanged
{
public event PropertyChangedEventHandler PropertyChanged;
protected void OnPropertyChanged([CallerMemberName] string propertyName = "")
{
var handler = PropertyChanged;
if (handler != null)
handler(this, new PropertyChangedEventArgs(propertyName));
}
}

public class ViewModel : ViewModelBase
{
ModelFacade _model;
public string FirstName
{
get { return _model.Person.FirstName; }
set
{
_model.Person.FirstName = value;
OnPropertyChanged("FirstName");
OnPropertyChanged("FullName");
}
}
public string LastName
{
get { return _model.Person.LastName; }
set
{
_model.Person.LastName = value;
OnPropertyChanged("LastName");
OnPropertyChanged("FullName");
}
}
public string FullName
{
get { return _model.Person.FullName; }
}
public ViewModel()
{
_model = new ModelFacade("Binod", "Mahto");
}
}

View (MainWindow.xaml)

<Window x:Class="WpfAppNet2.MainWindow"
xmlns="http://schemas.microsoft.com/winfx/2006/xaml/presentation"
xmlns:x="http://schemas.microsoft.com/winfx/2006/xaml"
xmlns:d="http://schemas.microsoft.com/expression/blend/2008"
xmlns:mc="http://schemas.openxmlformats.org/markup-compatibility/2006"
xmlns:local="clr-namespace:WpfAppNet2"
mc:Ignorable="d"
Title="MainWindow" Height="450" Width="800">
<Window.DataContext>
<local:ViewModel x:Name="vm"/>
</Window.DataContext>
<Grid Margin="10" HorizontalAlignment="Center" VerticalAlignment="Center">
<Grid.ColumnDefinitions>
<ColumnDefinition Width="20"/>
<ColumnDefinition Width="Auto"/>
<ColumnDefinition Width="20"/>
</Grid.ColumnDefinitions>
<Grid.RowDefinitions>
<RowDefinition Height="20"/>
<RowDefinition Height="Auto"/>
<RowDefinition Height="20"/>
</Grid.RowDefinitions>
<TextBlock Text="First Name:" Grid.Column="1" Grid.Row="1"/>
<TextBox Text="{Binding Mode=TwoWay, Path=FirstName, UpdateSourceTrigger=PropertyChanged}" Grid.Column="2" Grid.Row="1" Width="100" />
<TextBlock Text="Last Name:" Grid.Column="1" Grid.Row="2"/>
<TextBox Text="{Binding Mode=TwoWay, Path=LastName, UpdateSourceTrigger=PropertyChanged}" Grid.Column="2" Grid.Row="2" Width="100"/>
<TextBlock Text="Full Name:" Grid.Column="1" Grid.Row="4"/>
<TextBlock Text="{Binding FullName}" Grid.Column="2" Grid.Row="4"/>
<TextBlock Text="{Binding Mode=TwoWay, Path=Message}" Grid.Column="2" Grid.ColumnSpan="2" Grid.Row="5"/>
<Button Content="Save Me!" Name="btnSave" Click="btnSave_Click" Grid.Column="1" Grid.Row="6"/>
<TextBox TextWrapping="Wrap" AcceptsReturn="True" Name="txtSavedData" Grid.Column="1" Grid.ColumnSpan="2" Grid.Row="7"/>
</Grid>
</Window>

Suggestion: Avoid doing control drag & drop if you really want to use the WPF best of it and follow Grid Rows and Columns based design as I did here otherwise you will never get your code right in UI because of autogenerated margins when you drag and drop controls.

Code Behind. (MainWindow.xaml.cs)

public partial class MainWindow : Window
{
public MainWindow()
{
InitializeComponent();
}
private void btnSave_Click(object sender, RoutedEventArgs e)
{
txtSavedData.Text = vm.FirstName + "\n" + vm.LastName + "\n" + vm.FullName;
}
}

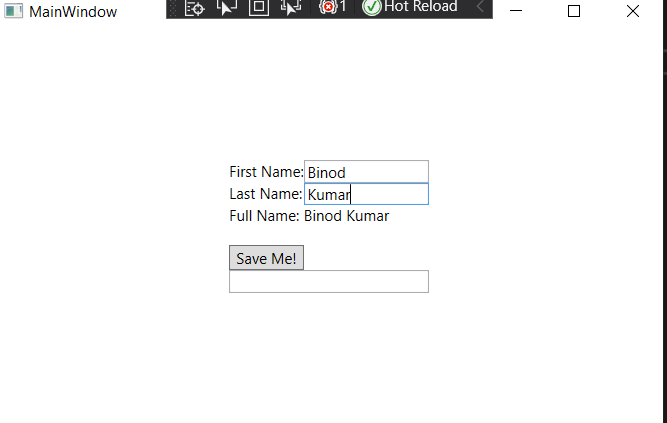
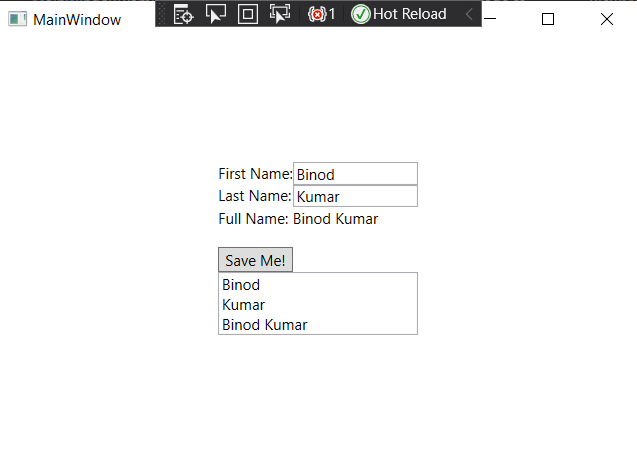
and here is the output:
1. When it loads:

2. Either change First Name or Last Name, you will the Full Name changing accordingly.

3. Click on save to see the modified state of Model Facade properties.

Now you can easily use the ModelFacase modified state to send the data back from ViewModel to Model for update.

Hope you like it.