Wednesday 15 November 2023

Understanding Watchers in Vue

 One of my favorite features for frontend development and it is fun to use but tricky and deadly too if not used properly.

Watchers are functions to trigger a callback whenever the reactive state changes for the data property. We use it when certain action needs to be performed on data change for a property.

Watch for data property

<template>
<div class="about">
<div>
<input id="input1" v-model="fullName" type="text" />
</div>
</div>

</template>

<script lang="ts">
import { reactive, computed, onMounted, ref } from 'vue'

export default {
name: 'aboutViewComponent',
components: {},
props: {},
data() {
return {
fullName: 'John Cena'
}
},
watch: {
fullName: {
handler: function (newValue, oldValue) {
alert(newValue);
}
}
},
}
</script>

In the above code, when the value changes for the data property ‘fullName’ the watch trigger will be triggered and it will show the new value in alert. it is so simple but the fun starts from here.

Watch with a complex type of data property.

Let’s replace the data property ‘fullName’ with a complex type ‘author’ that has a name property and then we need to watch the change when the author’s name changes.

<template>
<div class="about">
<div>
<input id="input" v-model="author.name" type="text" />
<button @click="onSubmit">Submit</button>
</div>
</div>
</template>

<script lang="ts">
import { reactive, computed, onMounted, ref } from 'vue'

export default {
name: 'aboutViewComponent',
components: {},
props: {},
data() {
return {
author: {
name: 'John Doe',
books: [
'Vue 2 - Advanced Guide',
'Vue 3 - Basic Guide',
'Vue 4 - The Mystery'
]
}
}
},
watch: {
author: {
handler: function (newValue, oldValue) {
alert(newValue.name);
}
}
},
methods: {
onSubmit() {
this.$data.author = {
name: 'John Cena',
books: [
'Vue 2 - Advanced Guide',
'Vue 3 - Basic Guide',
'Vue 4 - The Mystery',
]
};
console.log("Submit is fired");
},
},
}
</script>

But here, the watch handler on ‘author’ doesn’t work as expected when you change the author name for text input, though the watch implicitly creates a deep watcher and the callback should trigger for all nested mutations for ‘author’.
At the same time, the watch handler on ‘author’ triggered if you click on the submit button and the difference is, on submit we are changing the whole object of the author.

Note: The watcher on getters returns a reactive object will be triggered only when the getter returns a different object.

Deep watchers

But we need to get the watcher triggers whenever any property of the author changes, and to do this we need to explicitly force the deep watcher by using the deep option:

 watch: {
author: {
deep: true,
handler: function (newValue, oldValue) {
alert(newValue.name);
}
}
},

After this modification, any changes on the author either value change for nested property or entire object change, the watch will trigger the handler as per the code and we will see the alert popup.

Problem with Deep watch

Deep watch requires traversing all nested properties in the watched object and can be expensive when used on large data structures. Use it only when necessary and beware of the performance implications.

This is the part where most of the developers make mistakes.

Problem Statement: In a scenario, if I need to make a REST API call or emit an event to notify the change to other components only when the author name changes but should ignore it if otherwise.

Solution 1: This is where newValue and oldValue help, so we just need to put a check to compare the value before acting on this handler call. i.e.

watch: {
author: {
deep: true,
handler: function (newValue, oldValue) {
if(newValue.name !== oldValue.name){
alert(newValue.name);
}
}
}
},

Solution 2: Create a computed method to return the author name and put a watch on the computed method.

 computed: {
autherName(){
return this.author.name;
},
},
watch: {
autherName:{
handler: function (newValue, oldValue) {
alert("computed:"+ newValue);
}
}
},

I would prefer Solution 2 as this avoids traversing through all nested properties.

Eager watchers

watch is lazy by default: the callback won't be called until the watched source has changed.

In a case, where we want to make the API call to fetch some initial data and then re-fetch whenever the author name changes, we can use the immediate: true option to force the watcher’s callback immediately with author initialization.

watch: {
author: {
deep: true,
immediate: true,
handler: function (newValue, oldValue) {
if(newValue.name !== oldValue.name){
alert(newValue.name);
}
}
}
},

In this case, the handler will be executed when the page loads the first time.

Watchers on Props and computed functions

You can also put a watch on props and computed methods. Putting a watch on computed fields becomes very useful when you want to watch the change on mapGetters which directly you cannot but you can combine it with the computed method.

Here is the complete code that I use as an example above:

<template>
<div class="about">
<div>
<input id="input1" v-model="fullName" type="text" />
</div>
<div>
<input id="input2" v-model="author.name" type="text" />
<button @click="onSubmit">Submit</button>
</div>
</div>
</template>

<script lang="ts">
import { reactive, computed, onMounted, ref } from 'vue'

export default {
name: 'aboutViewComponent',
components: {},
props: {
city:{
type: String
}
},
data() {
return {
author: {
name: 'John Doe',
books: [
'Vue 2 - Advanced Guide',
'Vue 3 - Basic Guide',
'Vue 4 - The Mystery'
]
},
fullName: 'John Cena'
}
},
watch: {
author: {
deep: true,
immediate: true,
handler: function (newValue, oldValue) {
alert(newValue.name);
}
},
fullName: {
handler: function (newValue, oldValue) {
alert(newValue);
}
},
city: {
handler: function (newValue, oldValue) {
alert(newValue);
}
},
publishedBooksMessage: {
immediate: true,
handler: function (newValue, oldValue) {
alert(newValue);
}
}
},
methods: {
onSubmit() {
this.$data.author.books.push("Vue 3 - The Watcher");
this.$data.author = {
name: 'John Cena',
books: [
'Vue 2 - Advanced Guide',
'Vue 3 - Basic Guide',
'Vue 4 - The Mystery',
]
};
console.log("Submit is fired");
},
},
setup(props, { attrs }) {
console.log(`the component is now setup.`)
console.log(attrs)
},
computed: {
publishedBooksMessage() {
return this.author.books.length > 0 ? 'Yes' : 'No'
}
},
mounted() {
console.log(`the component is now mounted.`)
}

}
</script>

<style>
@media (min-width: 1024px) {
.about {
min-height: 100vh;
display: flex;
align-items: center;
}
}
</style>

Hope you enjoyed the content, follow me for more like this, and please don’t forget to LIKE it. Happy programming.
Use Microsoft Graph API with Azure AD Authentication in .Net Core, C#

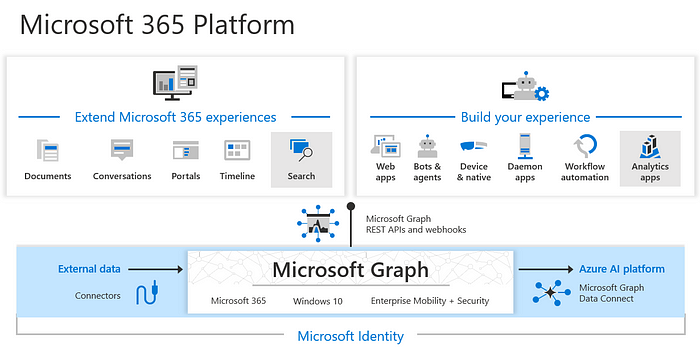
 Microsoft Graph is a RESTful web API that enables you to access Microsoft Cloud service resources. It allows you to access data across Microsoft 365 services i.e. emails, chats, calendars, user profiles, etc.

REST APIs are built on OData standards so can use the Odata syntax to query data through graph API with Postman or programmatically. Here in this article, we will see, how to call the Graph APIs in the .Net Core Web API project with C#.

For this example, we will create an ASP.NET Core web API project and follow the below steps:

Step 1: Configure Azure AD Authentication from the Project side.

To configure the Azure AD authentication, we need to add a few settings in appsettings.json and the below code in Program.cs as well as a middleware to validate the Azure AD Token.

appsettings.json

"AzureAd": {
"Domain": "domain name",
"TenantId": "AD Tenant ID",
"ClientId": "AD Client Id",
"Instance": "https://login.microsoftonline.com",
"ClientSecret": "Client secret"
},
"GraphApi": {
"BaseUrl": "https://graph.microsoft.com/v1.0",
"Scopes": "User.Read.All"
},

Above all values must be available in the appsettings.json otherwise Azure AD authentication and Graph API calls will fail.

Program.cs

using Microsoft.AspNetCore.Authentication.JwtBearer;
using Microsoft.Identity.Web;


builder.Services.AddAuthentication(JwtBearerDefaults.AuthenticationScheme)
.AddMicrosoftIdentityWebApi(options =>
{
options.TokenValidationParameters.ValidateAudience = false;
options.TokenValidationParameters.ValidateIssuer = true;
options.TokenValidationParameters.ValidIssuers = new string[] { $"https://login.microsoftonline.com/{builder.Configuration["AzureAD:TenantId"]}/v2.0" };
}, options =>
{
builder.Configuration.Bind("AzureAd", options);
})
.EnableTokenAcquisitionToCallDownstreamApi(options =>
{
builder.Configuration.Bind("AzureAd", options);
})
.AddMicrosoftGraph(builder.Configuration.GetSection("GraphApi"))
.AddDistributedTokenCaches();

In the above code here, we are enabling the Authentication service to validate Azure AD Jwt auth Token and adding the Graph API support to make a call to Graph APIs using the AD Token.
Nuget packages required are:

Microsoft.Graph
Microsoft.Identity.Web.GraphServiceClient
Microsoft.AspNetCore.Authentication.AzureAD.UI and
Microsoft.Identity.Web

a Middleware to validate the token, i.e. JwtTokenValidationMiddleware.cs

using Microsoft.Extensions.Options;
using Microsoft.IdentityModel.Protocols;
using Microsoft.IdentityModel.Protocols.OpenIdConnect;
using Microsoft.IdentityModel.Tokens;
using System.IdentityModel.Tokens.Jwt;
using System.Net;
using System.Security.Claims;

public class JwtTokenValidationMiddleware
{
private readonly RequestDelegate _next;
public JwtTokenValidationMiddleware(RequestDelegate next)
{
_next = next;
}

public async Task Invoke(HttpContext context)
{
bool isAuthenticated = false;
var token = context.Request.Headers["Authorization"].FirstOrDefault()?.Split(" ").Last();
var AzureAdInstance = "value from appsettings.json";
var AzureAdTenantId = "value from appsettings.json";
var AzureAdClientId = "value from appsettings.json";

if (token != null)
{
//set the value for AzureAdTenantId, AzureAdClientId and AzureAdInstance as per your appsettings.json
string issuer = $"{AzureAdInstance}/{AzureAdTenantId}/v2.0";
string stsDiscoveryEndpoint = $"{AzureAdInstance}/{AzureAdTenantId}/v2.0/.well-known/openid-configuration";

try
{
var configManager = new ConfigurationManager<OpenIdConnectConfiguration>(stsDiscoveryEndpoint, new OpenIdConnectConfigurationRetriever());
var config = configManager.GetConfigurationAsync().Result;

var tokenHandler = new JwtSecurityTokenHandler();

var validationParameters = new TokenValidationParameters
{
ValidAudience = {AzureAdClientId},
ValidIssuer = issuer,
IssuerSigningKeys = config.SigningKeys,
ValidateLifetime = true,
};

var claim = tokenHandler.ValidateToken(token, validationParameters, out _);

if(claim != null)
isAuthenticated = true;

}
catch (Exception ex)
{
isAuthenticated = false;
}
}
if(isAuthenticated)
await _next(context);
else
{
context.Response.Clear();
context.Response.StatusCode = (int)HttpStatusCode.Unauthorized;
await context.Response.WriteAsync("Unauthorized");
return;
}
}

}

In the code in Program.cs, you can configure as many TokenValidationParameters to validate the token accordingly as per your need.
With this, we are done with Azure AD authentication from the code side.

Note: Don’t forget to use the JwtTokenValidationMiddleware in the Configure method of startup.cs.

 app.UseMiddleware<JwtTokenValidationMiddleware>();

Step 2: Add the required resource scope permission for Graph APIs

Your Enterprise Application, which is used to generate the Azure AD token must have Microsoft Graph API permission w.r.t to Microsoft 365 resources you need to access.

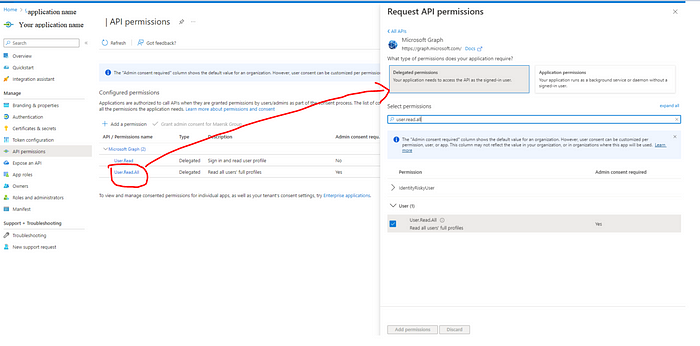
For example, if you need to access the user’s profile like name, email, profile pic, org hierarchy etc then you would need User.Read.All scope permission assigned for the application.

Go to Azure AD and search your application and navigate to API Permissions add the required permissions for Graph API. In this example, I’m adding User.Read.All delegated permission to read the user’s profile.

Note: You might need admin consent for your required scopes.

With this step, we are done with Settings.

Step 3: Adding a service class for User profiles data fetching using Graph API. .i.e. UserProfileService.cs

using Microsoft.Graph;

namespace MyApplication
{

public class UserInfo
{
public string Name { get; set; }
public string EmailId { get; set; }
public string ProfilePic { get; set; }
}

public class UserProfileService: IUserProfileService
{
private readonly GraphServiceClient _graphServiceClient;

public ADUserRepository(GraphServiceClient graphServiceClient)
{
_graphServiceClient = graphServiceClient;
}

public async Task<UserInfo> GetUserInformation(string userId)
{
var result = await _graphServiceClient.Users[userId].GetAsync();

var user = new UserInfo
{
EmailId = result.Mail,
Name = result.DisplayName,
ProfilePic =""
};

try
{
var photoresponse = await _graphServiceClient.Users[userId].Photos["48x48"].Content.GetAsync();
if (photoresponse != null)
{

MemoryStream ms = new MemoryStream();
photoresponse.CopyTo(ms);
ms.Position = 0;
var fileBytes = ms.ToArray();
user.ProfilePic= $"data:image/png;base64,{Convert.ToBase64String(fileBytes)}";
}

}
catch (Exception ex)
{
//log your exception
}

return user;
}
}
}

and add this service to the Service collection in Program.cs as

builder.Services.AddScoped<IUserProfileService, UserProfileService>();

Note: Graph Service client can’t be used with singleton instance hence you have to add your service to IServiceCollection as scoped service.

We need GraphServiceClient to call the Graph APIs which requires credentials and scopes but with the above approach, it is simple as the GraphServiceClient instance is getting created by Microsoft Dependency service collection and getting injected at run time.

Hope you enjoyed the content, follow me for more like this, and please don’t forget to LIKE it. Happy programming.