Showing posts with label best practices. Show all posts

Monday, 5 December 2022

CICD best practices

 CICD is the process of automating the building, testing & deploying of your application.

  1. Plan your repo
  2. Choose your tools
  3. Plan your Tests automation
  4. Secure your pipelines and secrets
  5. Pipelines for early-stage verification and deployment
  6. Involve the Team.

Wednesday, 15 December 2021

Tune up your Docker file — Best Practices

 Docker is a set of platform as a service products that use OS-level virtualization to deliver software in packages called containers.

1. Use the appropriate specific version image as base image instead of using generalized base image and start installing required packages.

FROM mcr.microsoft.com/dotnet/aspnet:5.0 AS base
From node:17.2.0

2. Always try to use the minimum light weight image as suits your requirements.

docker image inspect mcr.microsoft.com/dotnet/aspnet:5.0

3. Optimize caching image layer

FROM node:17.2.0-alpineWORKDIR /appCOPY package.json package-lock.json .RUN npm install --productionCOPY myapp /appCMD ["node", "src/index.js"] 

4. Avoid files/folder to copy to image not required

**/.classpath
**/.dockerignore
**/.env
**/.git
**/.gitignore
**/.project
**/.settings
**/.toolstarget
**/.vs
**/.vscode
**/*.*proj.user
**/*.dbmdl
**/*.jfm
**/azds.yaml
**/bin
**/charts
**/docker-compose*
**/Dockerfile*
**/node_modules
**/npm-debug.log
**/obj
**/secrets.dev.yaml
**/values.dev.yaml
LICENSE
README.md

5. Use the Multi-stage builds concepts.

FROM mcr.microsoft.com/dotnet/aspnet:5.0 AS base
WORKDIR /app
EXPOSE 80
EXPOSE 443
FROM mcr.microsoft.com/dotnet/sdk:5.0 AS build
WORKDIR /src
COPY ["CoreWebAPIDemo.csproj", "."]
RUN dotnet restore "./CoreWebAPIDemo.csproj"
COPY . .
WORKDIR "/src/."
RUN dotnet build "CoreWebAPIDemo.csproj" -c Release -o /app/build
FROM build AS publish
RUN dotnet publish "CoreWebAPIDemo.csproj" -c Release -o /app/publish
FROM base AS final
WORKDIR /app
COPY --from=publish /app/publish .

ENTRYPOINT ["dotnet", "CoreWebAPIDemo.dll"]

6. Use the least privileged user to start the application

USER ContainerUserENTRYPOINT ["dotnet", "CoreWebAPIDemo.dll"]

7. Perform Vulnerability scanning for Docker image

Saturday, 26 June 2021

WPF Data Binding Best Practices

 I just started learning WPF and today I’m gonna share the WPF basics for two way data bindings and the focus would be on designing your Model and ViewModel.

WPF is based on MVVM design patterns and this is how I see/understand it.

Model should only be responsible for Business & Data logics and it should not have any dependency with UI. Well, I say it as I have seen many articles where people have used INotifyPropertyChanged derived with their Models. I’m not saying it is completely wrong but doesn’t seems to be a best practices as well. Think about a scenario where your Model is shared among multiple services and wpf application.

So what I prefer here to use MVVM with Facade Pattern to separate out the UI dependency with Model.

Another important thing which I noticed with articles flooded over the internet is, Use of DependencyObject override for ViewModel for data binding. I didn’t find it a best practice as well because of the limitations/issues it is giving like:
1. It creates a View dependencies and it never meant to be a source of a binding.
2. Can’t override Equals or GetHashCode (may be less important)
3. Thread affinity problem: a huge issue dealing with multi threading
4. Serialization problem: another problem if you want to serialize anything in ViewModel
5. Difficult to read: I hate this as this implementation makes code too difficult to read/understand specially for people like me, who is learning.
6. Still need INotifyPropertyChanged for CLR properties.

Hence finally here we got two best practices to be followed for WPF data binding:
1. Use Facade for Models and 2. use INotifyPropertyChanged.

Now lets do the programming. A simple application which has a person info, First Name, Last Name and Full Name and how we bind it by following above two best practices.

Model (Person.cs)

public class Person
{
public string FirstName { get; set; }
public string LastName { get; set; }
public string FullName => $"{FirstName} {LastName}";

public Person() { }
public Person(string firstName, string lastName)
{
FirstName = firstName;
LastName = lastName;
}
}

As I said, we will not keep any dependency with Model to UI and ViewModel and the reason could be like, this model has too much probably not needed for me or we need to use multiple models together for view model.

Model Facade (ModelFacade.cs =>you name it as you want)

public class ModelFacade
{
public Person Person { get; set; }
public ModelFacade(string firstName, string lastName)
{
Person = new Person
{
FirstName = firstName,
LastName = lastName
};
}
}

Now here we go with ViewModel which will be implementing INotifyPropertyChanged. Also for code extendibility or avoid code duplicity I prefer (actually I recommend it as a best practice) ViewModelBase to separate the INotifyPropertyChanged implementation.

ViewModel (ViewModel.cs) and ViewModelBase (ViewModelBase.cs)

public class ViewModelBase : INotifyPropertyChanged
{
public event PropertyChangedEventHandler PropertyChanged;
protected void OnPropertyChanged([CallerMemberName] string propertyName = "")
{
var handler = PropertyChanged;
if (handler != null)
handler(this, new PropertyChangedEventArgs(propertyName));
}
}

public class ViewModel : ViewModelBase
{
ModelFacade _model;
public string FirstName
{
get { return _model.Person.FirstName; }
set
{
_model.Person.FirstName = value;
OnPropertyChanged("FirstName");
OnPropertyChanged("FullName");
}
}
public string LastName
{
get { return _model.Person.LastName; }
set
{
_model.Person.LastName = value;
OnPropertyChanged("LastName");
OnPropertyChanged("FullName");
}
}
public string FullName
{
get { return _model.Person.FullName; }
}
public ViewModel()
{
_model = new ModelFacade("Binod", "Mahto");
}
}

View (MainWindow.xaml)

<Window x:Class="WpfAppNet2.MainWindow"
xmlns="http://schemas.microsoft.com/winfx/2006/xaml/presentation"
xmlns:x="http://schemas.microsoft.com/winfx/2006/xaml"
xmlns:d="http://schemas.microsoft.com/expression/blend/2008"
xmlns:mc="http://schemas.openxmlformats.org/markup-compatibility/2006"
xmlns:local="clr-namespace:WpfAppNet2"
mc:Ignorable="d"
Title="MainWindow" Height="450" Width="800">
<Window.DataContext>
<local:ViewModel x:Name="vm"/>
</Window.DataContext>
<Grid Margin="10" HorizontalAlignment="Center" VerticalAlignment="Center">
<Grid.ColumnDefinitions>
<ColumnDefinition Width="20"/>
<ColumnDefinition Width="Auto"/>
<ColumnDefinition Width="20"/>
</Grid.ColumnDefinitions>
<Grid.RowDefinitions>
<RowDefinition Height="20"/>
<RowDefinition Height="Auto"/>
<RowDefinition Height="20"/>
</Grid.RowDefinitions>
<TextBlock Text="First Name:" Grid.Column="1" Grid.Row="1"/>
<TextBox Text="{Binding Mode=TwoWay, Path=FirstName, UpdateSourceTrigger=PropertyChanged}" Grid.Column="2" Grid.Row="1" Width="100" />
<TextBlock Text="Last Name:" Grid.Column="1" Grid.Row="2"/>
<TextBox Text="{Binding Mode=TwoWay, Path=LastName, UpdateSourceTrigger=PropertyChanged}" Grid.Column="2" Grid.Row="2" Width="100"/>
<TextBlock Text="Full Name:" Grid.Column="1" Grid.Row="4"/>
<TextBlock Text="{Binding FullName}" Grid.Column="2" Grid.Row="4"/>
<TextBlock Text="{Binding Mode=TwoWay, Path=Message}" Grid.Column="2" Grid.ColumnSpan="2" Grid.Row="5"/>
<Button Content="Save Me!" Name="btnSave" Click="btnSave_Click" Grid.Column="1" Grid.Row="6"/>
<TextBox TextWrapping="Wrap" AcceptsReturn="True" Name="txtSavedData" Grid.Column="1" Grid.ColumnSpan="2" Grid.Row="7"/>
</Grid>
</Window>

Suggestion: Avoid doing control drag & drop if you really want to use the WPF best of it and follow Grid Rows and Columns based design as I did here otherwise you will never get your code right in UI because of autogenerated margins when you drag and drop controls.

Code Behind. (MainWindow.xaml.cs)

public partial class MainWindow : Window
{
public MainWindow()
{
InitializeComponent();
}
private void btnSave_Click(object sender, RoutedEventArgs e)
{
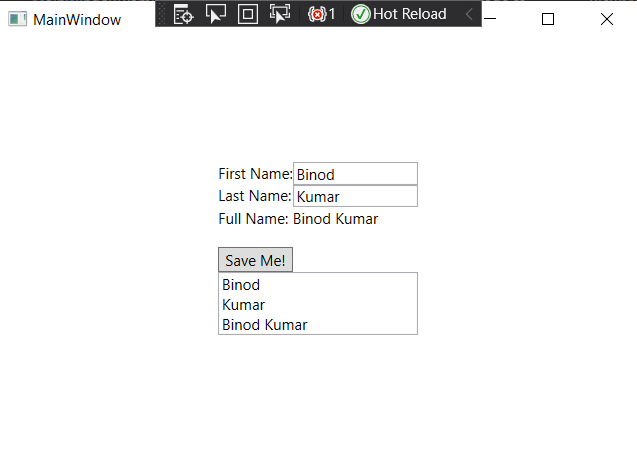
txtSavedData.Text = vm.FirstName + "\n" + vm.LastName + "\n" + vm.FullName;
}
}

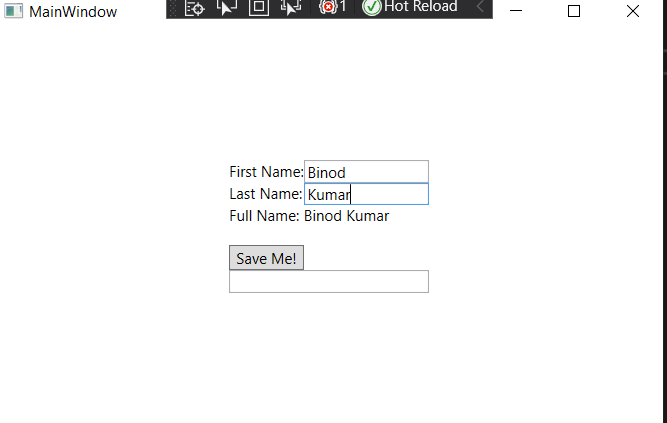
and here is the output:
1. When it loads:

2. Either change First Name or Last Name, you will the Full Name changing accordingly.

3. Click on save to see the modified state of Model Facade properties.

Now you can easily use the ModelFacase modified state to send the data back from ViewModel to Model for update.

Hope you like it.

Monday, 15 June 2015

Exception Handling - Best Practices

Exception Handling: A well known Concept. I hope everyone knows about it. A very simple but crucial piece of code.
In C#, it's all about try, catch and finally block.
try
{
       //Contains code which could throw unexpected error at run time which is called exception.
}
Catch(Exception)
{
      //Contains  exception handle logic, Ex.: logging.
}
finally
{
      //Contains code which will get executed if try block is executed. It will get executed if there is no exception or even if there is exception. Ex.: used to do memory release, connection close etc.
}


Looks very simple but still programmers do mistakes. So here I am going to discuss few best practices which I learned from my past experience.


1. Throwing exceptions hit performance badly. So try to minimize the 'throw' as much as possible.
Ex.:
void Method()
{
          for(int i = 0; i < 10000; i++)
          {
                try
                {  
                     if( i/2 == 0)
                            throw new Exception();
                 }
                 catch {}
         }
          Console.WriteLine("Loop Ends");
}

Above code practice is totally wrong. Just commenting out the " throw new Exception()" line of code can show the bad impact of having this line.

2. Can we put entire piece of code for a method in a single try block.
Yes. No harm in this.
Ex:
void Method()
{
       try
       {
              //Code
       }
       Catch(Exception)
       {
             
       }
}

3. Don't catch exception if you are not doing anything with the exception. Let the Calling method to catch exception and decide what to do.
Ex:
void Method()
{
       try
       {
              //Code
       }
       Catch(Exception)
       {
              throw;
       }
}

very bad practice of exception handling. It will hit the performance while throwing the exception, Never do it.

4. Don't use the catch exception object to throw exception if you need to catch the exception and then throw. It looses the stack trace details.
Ex:
void Method()
{
       try
       {
              //Code
       }
       Catch(Exception ex)
       {
             //Logging exception here or doing something.
              throw ex;
       }
}

the piece of code "throw ex" is bad practice instead you should write just "throw;"


5. Don't catch exception if you are not doing anything with the exception details.

6. All your public method must have 'try-catch' block instead of having it in private methods.
Note: Handle exception in private methods only if have no intention to throw exception to calling method.

7. Don't keep your catch block dumb.
Ex.
bool Method()
{
       bool status;
       try
       {
              //Code
       }
       Catch{}
       return status;
}

In above code you basically eat the exception. In this case if someone is calling this method he will always get returned FALSE and calling method will never know why return status is false.

8. Avoid returning "ex.Message"  Or "ex.InnerException.Message" as a return statement.
Ex:
string Method()
{
       try
       {
              //Code
       }
       catch (Exception ex)
      {
             return ex.Message; OR return ex.InnerException.Message;
      }
       return "";
}

Exception details always contains crucial and confidential information as it contains detail about the code, logic, resource details etc. So by writing above code you are basically creating a security risk by passing information to calling method.

9. Always use Custom Exception to throw exception when it is raised by service which is going to get consumed by different consumers directly.
Ex. If you are developing a service library or an API which can be consumed by different consumer. In this case you should not throw actual exception as it contains details about you business logic.

10. Don't forget to use try-catch or you will end up showing yellow page with exception details to the user.

Thank you for reading.
Feel free to provide your feedback/comments.