Azure Web Pub Sub Service is an Azure-managed real-time messaging service built on a publish-subscribe pattern using WebSocket. It allows publishing content updates between servers and connected clients in real-time. It has built-in support for large-scale client connection and highly available architectures.
Do not confuse or mix it with Azure’s SignalR service though both serve the same purpose to help customers build real-time web applications easily with large scale and high availability and enable customers to focus on their business logic instead of managing the messaging infrastructure. In general, you may choose Azure SignalR Service if you already use the SignalR library to build real-time applications. Instead, if you’re looking for a generic solution to build real-time applications based on WebSocket and publish-subscribe patterns, you may choose Azure Web PubSub service. The Azure Web PubSub service is not a replacement for Azure SignalR Service.
Here we see an example, How to build a quick chat app among clients. The technology we use in the example is as:
1. A backend Service, NodeJs and
2. A client application, simple HTML/Angular.Vuejs application. In my case, I’m using Vuejs here.
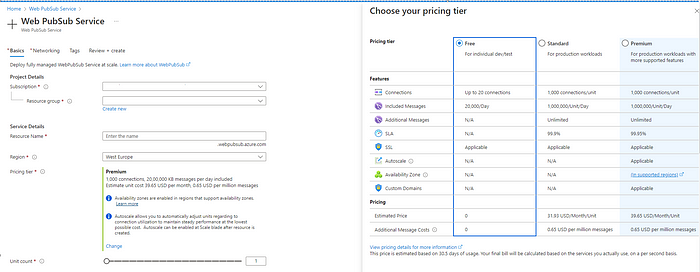
Before we proceed with examples, We need to create the Azure Web Pub Sub Service. Login to your Azure Portal and search for “Web PubSub Service” and create the service. For this example, we create a Free instance.

Our service is created. Let's understand a few basic important concepts of Azure web pubsub service before we move into the code part.
- Connection: A connection here is a client or a client connection that represents an individual WebSocket connection connected to the Web PubSub service.
- Hub: It is a logical concept for a set of client connections. Usually, you use one hub for one purpose, for example, a chat hub, or a notification hub. When a client connection connects, it connects to a hub, and during its lifetime it belongs to that hub. Once a client connection connects to the hub, the hub exists. Different applications can share one Azure Web PubSub service by using different hub names.
Note: a default hub with the name “Hub” has been created already which we will be using for this example here. - Group: A group is a subset of connections to the hub. You can add a client connection to a group, or remove the client connection from the group, anytime you want. In simple words, the group is a chat room for users.
- User: A connection to Web PubSub belonging to a user. A user can have multiple connections i.e. connecting from multiple devices.
- Client Events: Events are created during the lifecycle of a client connection. i.e. WebSocket client connection creates a
connectevent when it tries to connect to the service, aconnectedevent when it successfully connected to the service, amessageevent when it sends messages to the service and adisconnectedevent when it disconnects from the service. - Event Handler: The event handler contains the logic to handle client events. You can register or configure handlers in the service through the portal or Azure CLI.
Now we can start to build our App and to create the client app first thing we would need is, to establish a connection to the Azure Web PubSub service and to do so we need a backend server because the NPM package libraries @azure/web-pubsub and @azure/web-pubsub-client doesn’t satisfy all the need or in other words, is not compatible with the browser (client code) to build/generate the connection URL. Also, you weed need a backend server to manage the groups which you can’t do in client code.
Note: You may generate the connection URL directly from Azure Web PubSub service’s Key settings but the generated URL is valid for 60 minutes defaulting to 1440 minutes (24 hours) max. Also, it won’t suit your need to build multiple groups at run time.
Steps to build the Backend Server app, which helps us to manage the connection, hubs & groups.
Step 1: Create a Node Js application using your favorite Editor tool (In my case, I use Visual Studio Code).
Step 2: if you already create package.json then add the below dependencies or if note then create the package.json file with the below code. It has all the required dependencies.
{
    "name": "chatapp-server",
    "version": "1.0.0",
    "description": "",
    "main": "server.js",
    "scripts": {
      "build": "webpack --mode=development --watch",
      "release": "webpack --mode=production",
      "publish": "npm run release && dotnet publish -c Release",
      "test": "echo TODO",
      "start": "node server.js"
    },
    "keywords": [],
    "author": "",
    "license": "ISC",
    "dependencies": {
      "@azure/web-pubsub": "^1.0.0",
      "@azure/web-pubsub-express": "^1.0.2",
      "events": "latest",
      "express": "^4.17.1",
    },
    "devDependencies": {
      "clean-webpack-plugin": "latest",
      "html-webpack-plugin": "latest",
      "webpack": "^5.75.0",
      "webpack-cli": "^5.0.1"
    }
  }
@azure/web-pubsub and @azure/web-pubsub-expres are the npm packages here that will be used to create the service client and the handlers.
Step 2: Create a javascript file named server.js with the below code.
const express = require('express');
const { WebPubSubServiceClient, AzureKeyCredential } = require('@azure/web-pubsub');
const { WebPubSubEventHandler } = require('@azure/web-pubsub-express');

const app = express();
const hubName = 'Hub';
const port = 8080;

//let connectionString = process.argv[2] || process.env.WebPubSubConnectionString;
const key = new AzureKeyCredential("<Key>");
const serviceClient = new WebPubSubServiceClient("https://<host name>", key, hubName);
let handler = new WebPubSubEventHandler(hubName, {
    path: '/eventhandler',
    onConnected: async req => {
        console.log(`${req.context.userId} connected`);
        await serviceClient.sendToAll({
            type: "system",
            message: `${req.context.userId} joined`
        });
    },
    handleUserEvent: async (req, res) => {
        if (req.context.eventName === 'broadcast') {
            await serviceClient.sendToAll({
                from: req.context.userId,
                message: req.data
            });
        }
        res.success();
    }
});

app.use(express.json());
app.use(function (req, res, next) {
    res.header("Access-Control-Allow-Origin", "*");
    res.header("Access-Control-Allow-Headers", "Origin, X-Requested-With, Content-Type, Accept");
    next();
});
app.use(handler.getMiddleware());

//Create the client/connection and returns the connection url by user and group.
app.post('/negotiate', async (req, res) => {
    const { groupName, id } = req.body;
    if (!id) {
        res.status(400).send('missing user id');
        return;
    }
    let token = await serviceClient.getClientAccessToken({ userId: id, expirationTimeInMinutes: 60,roles: [
        `webpubsub.sendToGroup.${groupName}`,
        `webpubsub.joinLeaveGroup.${groupName}`
    ] });
    res.json({
        url: token.url
    });
});

//Add users to the groups
app.post('/chatgroup/addusers', async (req, res) => {
    console.log(req.body);
    const { groupName, users } = req.body;
    if (!groupName) {
        res.status(400).send('missing groupName');
        return;
    }
    if (!users) {
        res.status(400).send('missing users');
        return;
    }
    const groupExists = await serviceClient.groupExists(groupName);
    if (groupExists) {
        let group = await serviceClient.group(groupName);
        users.forEach(async usr => {
            await group.addUser(usr);
        });
    }
    res.json(true);
});

//publish message to the group
app.post('/chatgroup/message', async (req, res) => {
    console.log(req.body);
    const { groupName, message } = req.body;
    if (!groupName) {
        res.status(400).send('missing groupName');
        return;
    }
    if (!message) {
        res.status(400).send('missing message');
        return;
    }
    const groupExists = await serviceClient.groupExists(groupName);
    if (groupExists) {
        let group = await serviceClient.group(groupName);
        await group.sendToAll(message);
        res.json(message);
        await serviceClient.createGroup(groupName);
    }
    else
        res.json(`${groupName} group doesn't exist.`);

});

app.use(express.static('public'));
app.listen(port, () => console.log(`Event handler listening at http://localhost:${port}${handler.path}`));
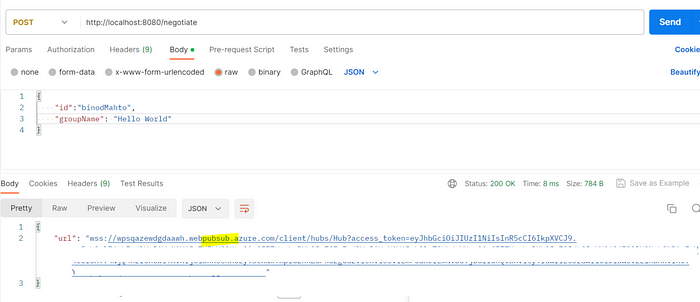
Here in the above code, we have three endpoints for getting the client connection URL which is required to create a service client instance in our client-side (app) code, and the other two are to add users to the existing group and publish messages to the group from the server if needed.
Instead of NodeJs you can also use Azure Functions here to get the client access url and code will be as:
const { WebPubSubServiceClient, AzureKeyCredential } = require('@azure/web-pubsub');

module.exports = async function (context, req) {

    try {
        const { groupName, userId, hubName } = req.body;
        // reading below settings from Azure function application setting
        // which is pulling these from Azure KeyVault.
        const hostUrl = process.env["WebPubSubURL"];
        const hostKey = process.env["WebPubSubKEY"];

        if (!userId || !groupName || !hubName) {
            context.res = {
                status: 400,
                body: `missing user id, hub Name or group name`
            };
        }
        else {
            const key = new AzureKeyCredential(hostKey);
            const serviceClient = new WebPubSubServiceClient(hostUrl, key, hubName);

            let token = await serviceClient.getClientAccessToken({
                userId: userId, expirationTimeInMinutes: 60, roles: [
                    `webpubsub.sendToGroup.${groupName}`,
                    `webpubsub.joinLeaveGroup.${groupName}`
                ]
            });

            context.res = {
                status: 200,
                body: {
                    url: token.url
                }
            };

            context.log('JavaScript HTTP trigger function:post-getchatappurl processed a request.');
            return;
        }
    } catch (err) {
        console.log(err);
        context.res = {
            status: 500
        };
        return;
    }
}
To read environments for local machine while testing your Azure Function code, use local.settings.json i.e.
{
  "IsEncrypted": false,
  "Values": {
    "AzureWebJobsStorage": "",
    "FUNCTIONS_WORKER_RUNTIME": "node",
    "WebPubSubURL":"<web pubsub host url>",
    "WebPubSubKEY":"web pubsub key"
  },
  "Host": {
    "LocalHttpPort": 7071,
    "CORS": "*"
  }
}
If you do not want the group and instead want to send all users connected to the hub, then avoid creating token with roles enabled by the group as per the below code:
let token = await serviceClient.getClientAccessToken({ userId: id, expirationTimeInMinutes: 60 });Now if run this with the command “npm run start”, you will be able to consume & test the endpoints from Postman.

Our server is ready to serve our needs, Now let’s create the chat app.
Steps to build the chat app, a client web application.
Note: Azure Web PubSub Service doesn’t persist your message hence if a user is not connected will lose the message. Hence you need to build your own logic to persist the message in the database and load it when a user comes online.
Step 1: Create your web application using Vue/Angular/React your choice.
Step 2: Create the Chat UI to show the user’s chats. If you are also creating the Vuejs application then can use the whole code below here or else, concentrate on UI (Html) code.
HTML Code
<template>
    <div class="chat-container">
        <section ref="chatArea" class="chat-area">
            <div>
                <div>
                    <div>
                        <u class="headline" style="float: left; padding: 5px;">{{ conversation.groupName}}</u>
                    </div>
                    <br />
                    <div style="display: flex; flex-direction: row;">
                        <!--Here you can show list of users involved in this chat.-->
                        <div style="float: left; padding: 5px;" v-for="chatuser in groupUsers" :key="chatuser.name">
                            <span class="label info" v-if="chatuser.emailId !== user.username">{{ chatuser.name }}</span>
                        </div>
                        <input type="button" value="Add Users" @click="AddUsers()"
                            style="float: right; padding: 5px;"/>
                    </div>
                </div>
                <hr />
                <div v-for="message in conversation.messages" :key="message.messageId">
                    <div>
                        <!-- <img :src="" class="user-img" /> -->
                        <p class="message"
                            :class="{ 'message-out': message.sender === user.userName, 'message-in': message.sender !== user.userName }">
                            <b>{{ message.sender }} {{ message.timestamp }}</b>
                            <br />
                            {{ message.message }}
                        </p>
                    </div>
                </div>

                <div v-show="conversation.status === 'Open'">
                    <textarea id="txtarea" name="txtarea" rows="4" cols="50" :value="userMessage" v-mc-model="userMessage"
                        hiddenlabel placeholder="type your message here..."/>
                </div>
                <div style="display: flex; flex-direction: row;">
                    <input type="button" value="Send" @click="SendMessage()" style="float: right; padding: 5px;" />
                    <input type="button" value="Cancel" @click="CancelMessage()"
                        style="float: right; padding: 5px;" />
                </div>
            </div>
        </section>
    </div>
</template>
CSS
.chat-container {
  display: flex;
  justify-content: center;
  overflow: hidden;
  padding-left: 10px;
  padding-right: 10px;
  padding-bottom: 10px;
  overflow-y: scroll;
}

.headline {
  text-align: left;
  font-weight: 100;
  color: #0073AB;
}
.chat-area {
  background-color: #FFFFFF;
  height: 100%;
  width: 100%;
  padding: 1em;
  overflow: hidden;
  margin: 0 auto 2em auto;
  box-shadow: 2px 2px 5px 2px #FFFFFF;
}
.message {
  border-radius: 10px;
  padding: .5em;
  margin-bottom: .5em;
  margin-top: .5em;
  font-size: .8em;
}
.message-out {
  background: #B5E0F5;
  color: #000000;
  margin-left: 20%;
}
.message-in {
  background: #DBDBDB;
  color: #000000;
  margin-right: 20%;
}

.chat-inputs {
  display: flex;
  justify-content: space-between;
}
#person1-input {
  padding: .5em;
}
#person2-input {
  padding: .5em;
}

.label {
  color: #00243D;
  padding: 5px;
  float: left;
  white-space: nowrap;
}
.info {
  background-color: #D3ECF9;
}
Please ignore if the above CSS has any extra unused CSS class as I just pasted it as it is from my local.
Step 2: Build the code as per the UI created Above. Above UI expecting the Message conversation in a format as:
{
  groupName: String, //Group Name
  message:{
    message: String,
    timestamp : String,
    sender: String
  }
}
Code
<script lang="ts">
//@ts-nocheck
import Vue from 'vue';
import { IData, IMethods, IComputed, IProps } from './interfaces';
import './styles/web-pubsubchat.scss';
import { mapGetters } from 'vuex';
import { GlobalGetterEnum, GlobalActionEnum, NAMESPACE } from '@/store/modules/global/static';
import {
    WebPubSubClient
} from "@azure/web-pubsub-client";

const hubName = 'Hub';

export default Vue.extend<IData, IMethods, IComputed, IProps>({
    name: 'web-pubsubchat',
    props: {

    },
    data() {
        return {
            conversation: {},
            userMessage: '',
            webPubSubClinet: {} as WebPubSubClient,
            groupUsers: [] //list of users in this chat.
        }
    },

    computed: {
        ...mapGetters(NAMESPACE, {
            user: GlobalGetterEnum.GET_USER,
        }),
    },

    methods: {
       async SendMessage() {
            try {
                await this.$data.webPubSubClinet.sendToGroup(
                        groupName,
                        {
                            groupName: this.$data.conversation.groupName,
                            message: {
                                message: responseMessage.message,
                                timestamp: responseMessage.timestamp,
                                sender: responseMessage.sender
                            }
                        },
                        "json"
                    );
                }
                this.$data.userMessage = '';
            }
            catch (error) {
                console.log(error);
            }
            this.$data.userMessage = '';
        },
        async CancelMessage() {
            this.$data.userMessage = '';
        },

        async removeUser($event: any, userEmailId: string): promise<void> {
            alert($event.details);
        },

        async AddUsers() {

        },

        async InitializeChatRoom() {
            try {
                let groupName = "HelpGroup";

                let clientAccessUrl = await api.chatHub.getClientAccessUrl(this.user.userName, groupName);
                this.$data.webPubSubClinet = new WebPubSubClient(clientAccessUrl);

                this.$data.webPubSubClinet.on("connected", (e) => {
                    debugger;
                    console.log(`Connection ${e.connectionId} is connected.`);
                });

                this.$data.webPubSubClinet.on("disconnected", (e) => {
                    debugger;
                    console.log(`Connection disconnected: ${e.message}`);
                });

                this.$data.webPubSubClinet.on("group-message", (e) => {
                    debugger;
                    if (e.message.data instanceof ArrayBuffer) {
                        console.log(
                            `Received message from ${e.message.group} ${Buffer.from(e.message.data).toString("base64")}`
                        );
                    } else {
                        console.log(`Received message from ${e.message.group}: ${e.message.data}`);
                        this.$data.conversation.messages.push({
                            message: e.message.data.message.message,
                            timestamp: e.message.data.message.timestamp,
                            sender: e.message.data.message.sender
                        });
                    }
                });

                await this.$data.webPubSubClinet.start();
                await this.$data.webPubSubClinet.joinGroup(groupName);

                await this.$data.webPubSubClinet.sendToGroup(
                    groupName,
                    {
                        groupName: this.$data.conversation.groupName,
                        message: {
                            message: `Hello, You are welcome to the group: ${groupName}`,
                            timestamp: "08-06 06:20 PM",
                            sender: this.user.userName
                        }
                    },
                    "json"
                );
            }
            catch (error) {
                console.log(error);
            }
            finally {
                this.$data.processing = false;
            }
        },
    },
    async created() {
        await this.InitializeChatRoom();
    },

    async unmounted() {
        try {
            await this.$data.webPubSubClinet.stop();
        }
        catch (error) {
            console.log(error);
        }
    }

});
</script>
In the above code, my application is connected through Azure AD, and the logged-in user state is stored in the Vuex store module which I’m reading through getter props “user”. Hence user.username is user’s email id.
When the page starts, the Chat room is initialized with the unique group name “HelloGroup” and the current logged in user. if you want you can add more users to it.
In the InitializeChatRoom() method (called when page loads with created hook of vuejs app), we below important actions (actions order are important here):
1. Create the client connection. Here we call the nodejs backend server api to generate the unique connection for the mentioned group and user. the code is:
let clientAccessUrl = await api.chatHub.getClientAccessUrl(this.user.userName, groupName);
this.$data.webPubSubClinet = new WebPubSubClient(clientAccessUrl);
we will persist the service client object in the “this.$data.webPubSubClinet” object to re-use throughout the page.
2. Add event handlers to listen “connected”, “disconnected” and “group-message”.
this.$data.webPubSubClinet.on("connected", (e) => {
                    debugger;
                    console.log(`Connection ${e.connectionId} is connected.`);
                });

                this.$data.webPubSubClinet.on("disconnected", (e) => {
                    debugger;
                    console.log(`Connection disconnected: ${e.message}`);
                });

                this.$data.webPubSubClinet.on("group-message", (e) => {
                    debugger;
                    if (e.message.data instanceof ArrayBuffer) {
                        console.log(
                            `Received message from ${e.message.group} ${Buffer.from(e.message.data).toString("base64")}`
                        );
                    } else {
                        console.log(`Received message from ${e.message.group}: ${e.message.data}`);
                        this.$data.conversation.messages.push({
                            message: e.message.data.message.message,
                            timestamp: e.message.data.message.timestamp,
                            sender: e.message.data.message.sender
                        });
                    }
                });
When we receive the message in group, through “group-message” event handler, we add the same to the “this.$data.conversation” object so that it will appear in chat area.
3. Start the client
await this.$data.webPubSubClinet.start();4. Join the group. This is important, if you don’t join then you won’t get messages back.
await this.$data.webPubSubClinet.joinGroup(groupName);That’s all. Now to send the message to the group, you use the code as:
await this.$data.webPubSubClinet.sendToGroup(
                    groupName,
                    {
                        groupName: this.$data.conversation.groupName,
                        message: {
                            message: `Hello, You are welcome to the group: ${groupName}`,
                            timestamp: "08-06 06:20 PM",
                            sender: this.user.userName
                        }
                    },
                    "json"
                );
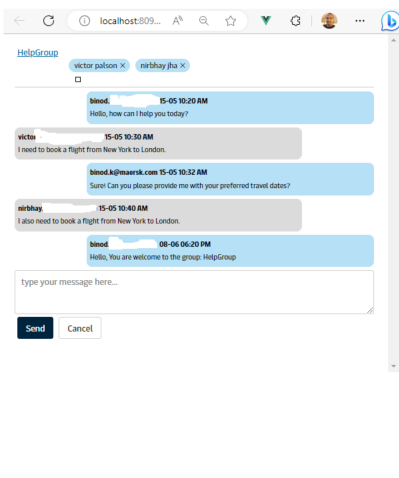
Now you run the application and open with multiple browsers with different/same user(s) and test the app, your UI will look like this:

Note: I hide the names (which is the user’s email Id) purposefully here as I had integrated it with Azure AD.
Enjoy, your chat app is ready.
References used for this app code:
https://github.com/Azure/azure-sdk-for-js
https://learn.microsoft.com/en-us/azure/azure-web-pubsub/overview
https://learn.microsoft.com/en-us/azure/azure-web-pubsub/tutorial-build-chat?tabs=csharp
Hope you enjoyed the content, follow me for more like this, and please don’t forget to LIKE it. Happy programming.
No comments:
Post a Comment