For the past couple of months, I spent my time heavily on infrastructure and CICD DevOps activity to host my applications, web, and backend application on Azure Kubernetes Cluster. Also if you follow me, my last few articles were all about a complete setup overview regarding CICD and security.
This article is about dockerizing a VueJS or Angular web application, though my web application here was on VueJS, the same technique applies to Angular applications to dockerize the application.
Before we begin, we need to take a decision on the server that will serve the application like http-server, Nginx, Apache etc. For development/testing we may use zero-configuration command-line http-server to server our web application but not recommended for production as the documentation says:
It is powerful enough for production usage, but it’s simple and hackable enough to be used for testing, local development, and learning.
So, in my case, I decided to use Nginx and this is all you need to do.
First, we need to create the DockerFile so add a file name “Dockefile” in your project root folder where package.json or config file exists and add the below code:
FROM node:16.15.0-alpine as build
WORKDIR /app

COPY package.*json ./
COPY .npmrc ./
COPY .env.production ./

RUN npm install

COPY . .

WORKDIR /app

RUN npm run build:production
RUN rm -f .npmrc

# production
FROM nginx:stable-alpine as production
COPY ./.nginx/nginx.conf /etc/nginx/nginx.conf

## Remove default nginx index page
RUN rm -rf /usr/share/nginx/html/*

COPY --from=build /app/dist /usr/share/nginx/html
# Expose 8030 this is optional
CMD ["nginx", "-g", "daemon off;"]
From the above file, first, we mention the build server as Node. In my case, I’m using a specific version of Node which you may change based on your need. Next line set the working folder as app, where the dist folder along with other config files will be created.
in the next step, we copied our required config files as package.*json (also includes package.lock.json), .npmrc (which contains token to connect and pull dependencies from my repo), .env files. You may add all your config files needed here to keep the code related to copying config files in one place otherwise in the next step (npm install), only package.json and .npmrc files are required.
So next we did, npm install and copied all (which include dist folder) to the working directory app folder.
In the next step, we build the application using the npm run build command and delete the .npmrc file copied from the first step required for the npm install.
Now we need to set the web server and we set it here as “nginx:stable-alpine”, you may choose other versions too based on your need. Here we need the Nginx configuration file to tell the Nginx server where to start i.e. root, port, no. of worker process, etc. We have not created this file yet so let’s do it by creating a file name nginx.conf with the below code inside the .nginx folder in your project root path as .nginx=>nginx.conf.
worker_processes 4;

events { worker_connections 1024; }

http {
    server {
        # listen 80; this is optional, it will be default to 80
        root  /usr/share/nginx/html;
        include /etc/nginx/mime.types;

        location /appui {
            try_files $uri /index.html;
        }
    }
}
Now we will go back to the Dockerfile and copy this nginx.conf file to the Nginx server inside an etc folder and also remove the default index page from the location usr/share/nginx/html/*
FROM nginx:stable-alpine as production
COPY ./.nginx/nginx.conf /etc/nginx/nginx.conf

RUN rm -rf /usr/share/nginx/html/*
and then we copy all the contents of the dist folder from the build server to Nginx server inside /usr/share/nginx/html and mention the command mentioned below to start the nginx.
COPY --from=build /app/dist /usr/share/nginx/html
# Expose 8030
CMD ["nginx", "-g", "daemon off;"]
Testing
If you have a docker desktop installed, follow the steps below to test.
step 1: run the below command using the command prompt from your project root folder where the package.json file exists.
docker build -t test/webapp_v1 .After the successful execution of the above command, you will see the image created in the docker desktop under Images.
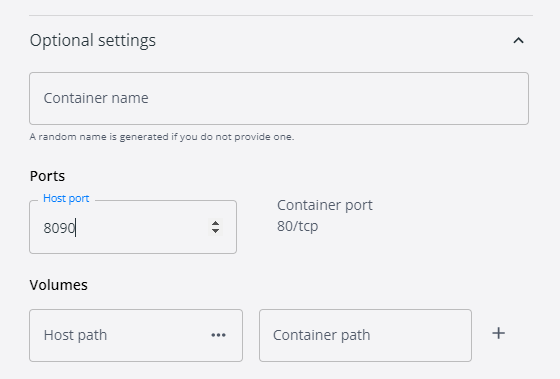
step 2: Click on Run and change the port setting from the host server and container as per our docker file and nginx.conf file where our container is exposed through port 8030 and the host server is at port 80. Please refer to the below screenshot:

Now open the browser and type http://localhost:8090/ to browse the application and your web app is up.
Bonus
Please follow my previous articles to push this image to Azure Container Registery and deploy it on Azure Kubernetes Cluster using GitHub Actions. Though these articles are for hosting .net core app but the steps remain the same with little modification as per the web app.
- CI/CD with GitHub Actions to deploy Applications to Azure Kubernetes Cluster
- Securing secrets with Azure Key Vault for GitHub Actions
Hope you enjoyed the content, follow me for more like this, and please don’t forget to clap for it. Happy programming.

No comments:
Post a Comment